Posted on

The One-Stick Saddle Hunting Revolution: A DIY Guide to Building Your Own One-Stick And How to Climb

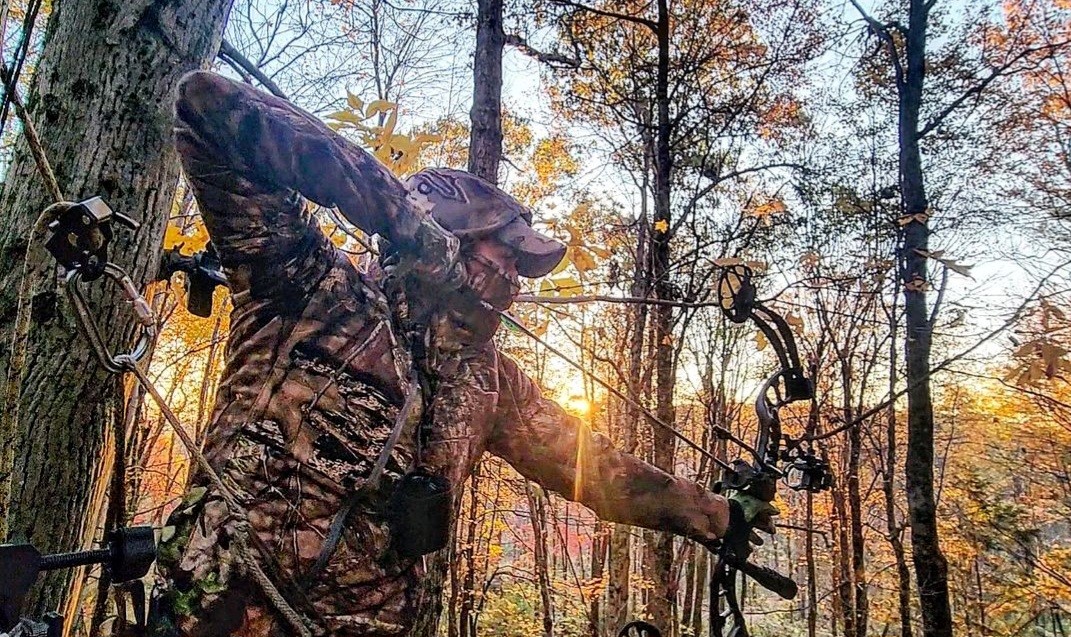
Have you ever wondered how to elevate your hunting experience and gain increased mobility while preserving safety? Look no further than the one-stick method for saddle hunting. I’m going to walk you through the step-by-step process of building your very own one-stick, allowing you to enjoy the benefits of this game-changing technique as well as how to climb and rappel down a tree.

One Stick Saddle Hunting

Saddle hunting has been gaining popularity among outdoor enthusiasts due to its versatility and low-impact approach. The one-stick method takes it a step further by providing hunters with enhanced mobility and convenience. By utilizing a single climbing stick, you can climb and rappel down trees swiftly and silently, opening up new possibilities in your hunting strategy.

In this article, we will look into the details of one-stick saddle hunting, including its key characteristics compared to traditional methods. We will also address crucial safety considerations that every hunter must be aware of before engaging in this technique. Additionally, we’ll provide a comprehensive list of essential gear needed for successful one-stick saddle hunting adventures.

Poachers Knot For One Stick Saddle Hunting

The heart of this guide lies in our detailed step-by-step instructions on how to build your own one-stick including a video demonstrating how to make one. From selecting the right materials to incorporating innovative techniques shared by experienced hunters, we’ll equip you with all the knowledge necessary to create a sturdy and reliable tool fit for any hunt.

But it doesn’t stop there! We will also guide you through mastering the art of using a one-stick for saddle hunting effectively. With valuable tips and insights from experts who have honed their skills over time, you’ll quickly become proficient in navigating trees safely and quietly.

To wrap things up, we’ll examine both the advantages and challenges associated with one-stick saddle hunting, allowing you to make an informed decision about integrating this technique into your own outdoor pursuits.

So grab your tools and let’s embark on an exciting journey towards enhancing your hunting experience with a DIY one-stick. Get ready to elevate your mobility, embrace new hunting strategies, and make unforgettable memories amidst the beauty of nature.

Tethrd Lockdown One Stick Saddle Hunting

Understanding One-Stick Saddle Hunting

Before diving into the process of building your own one-stick, it’s essential to have a clear understanding of what one-stick saddle hunting entails and how it differs from traditional hunting methods.

One-stick saddle hunting is a technique that revolutionizes the way hunters climb and get down trees. Instead of using multiple climbing sticks or ladders, a single climbing stick is utilized for increased mobility and convenience. By relying on this minimalist approach, hunters can enjoy enhanced maneuverability in the field while minimizing their gear load. Hunters then use a long rope to rappel out of the tree when the hunt is over.

Another advantage of this technique lies in its versatility. Whether you prefer moving frequently during a hunt or need quick access to different areas within your hunting grounds, carrying and utilizing just one stick dramatically increases your effectiveness in navigating various terrains.

In the next section, we will look into the necessary equipment needed for successful one-stick saddle hunting adventures.

Essential Gear for One-Stick Saddle Hunting

To embark on your one-stick saddle hunting journey, it’s crucial to have the right gear and equipment that will ensure a safe and successful experience. Here is a list of essential items you will need:

Tethrd Lockdown Hauler AltimAider
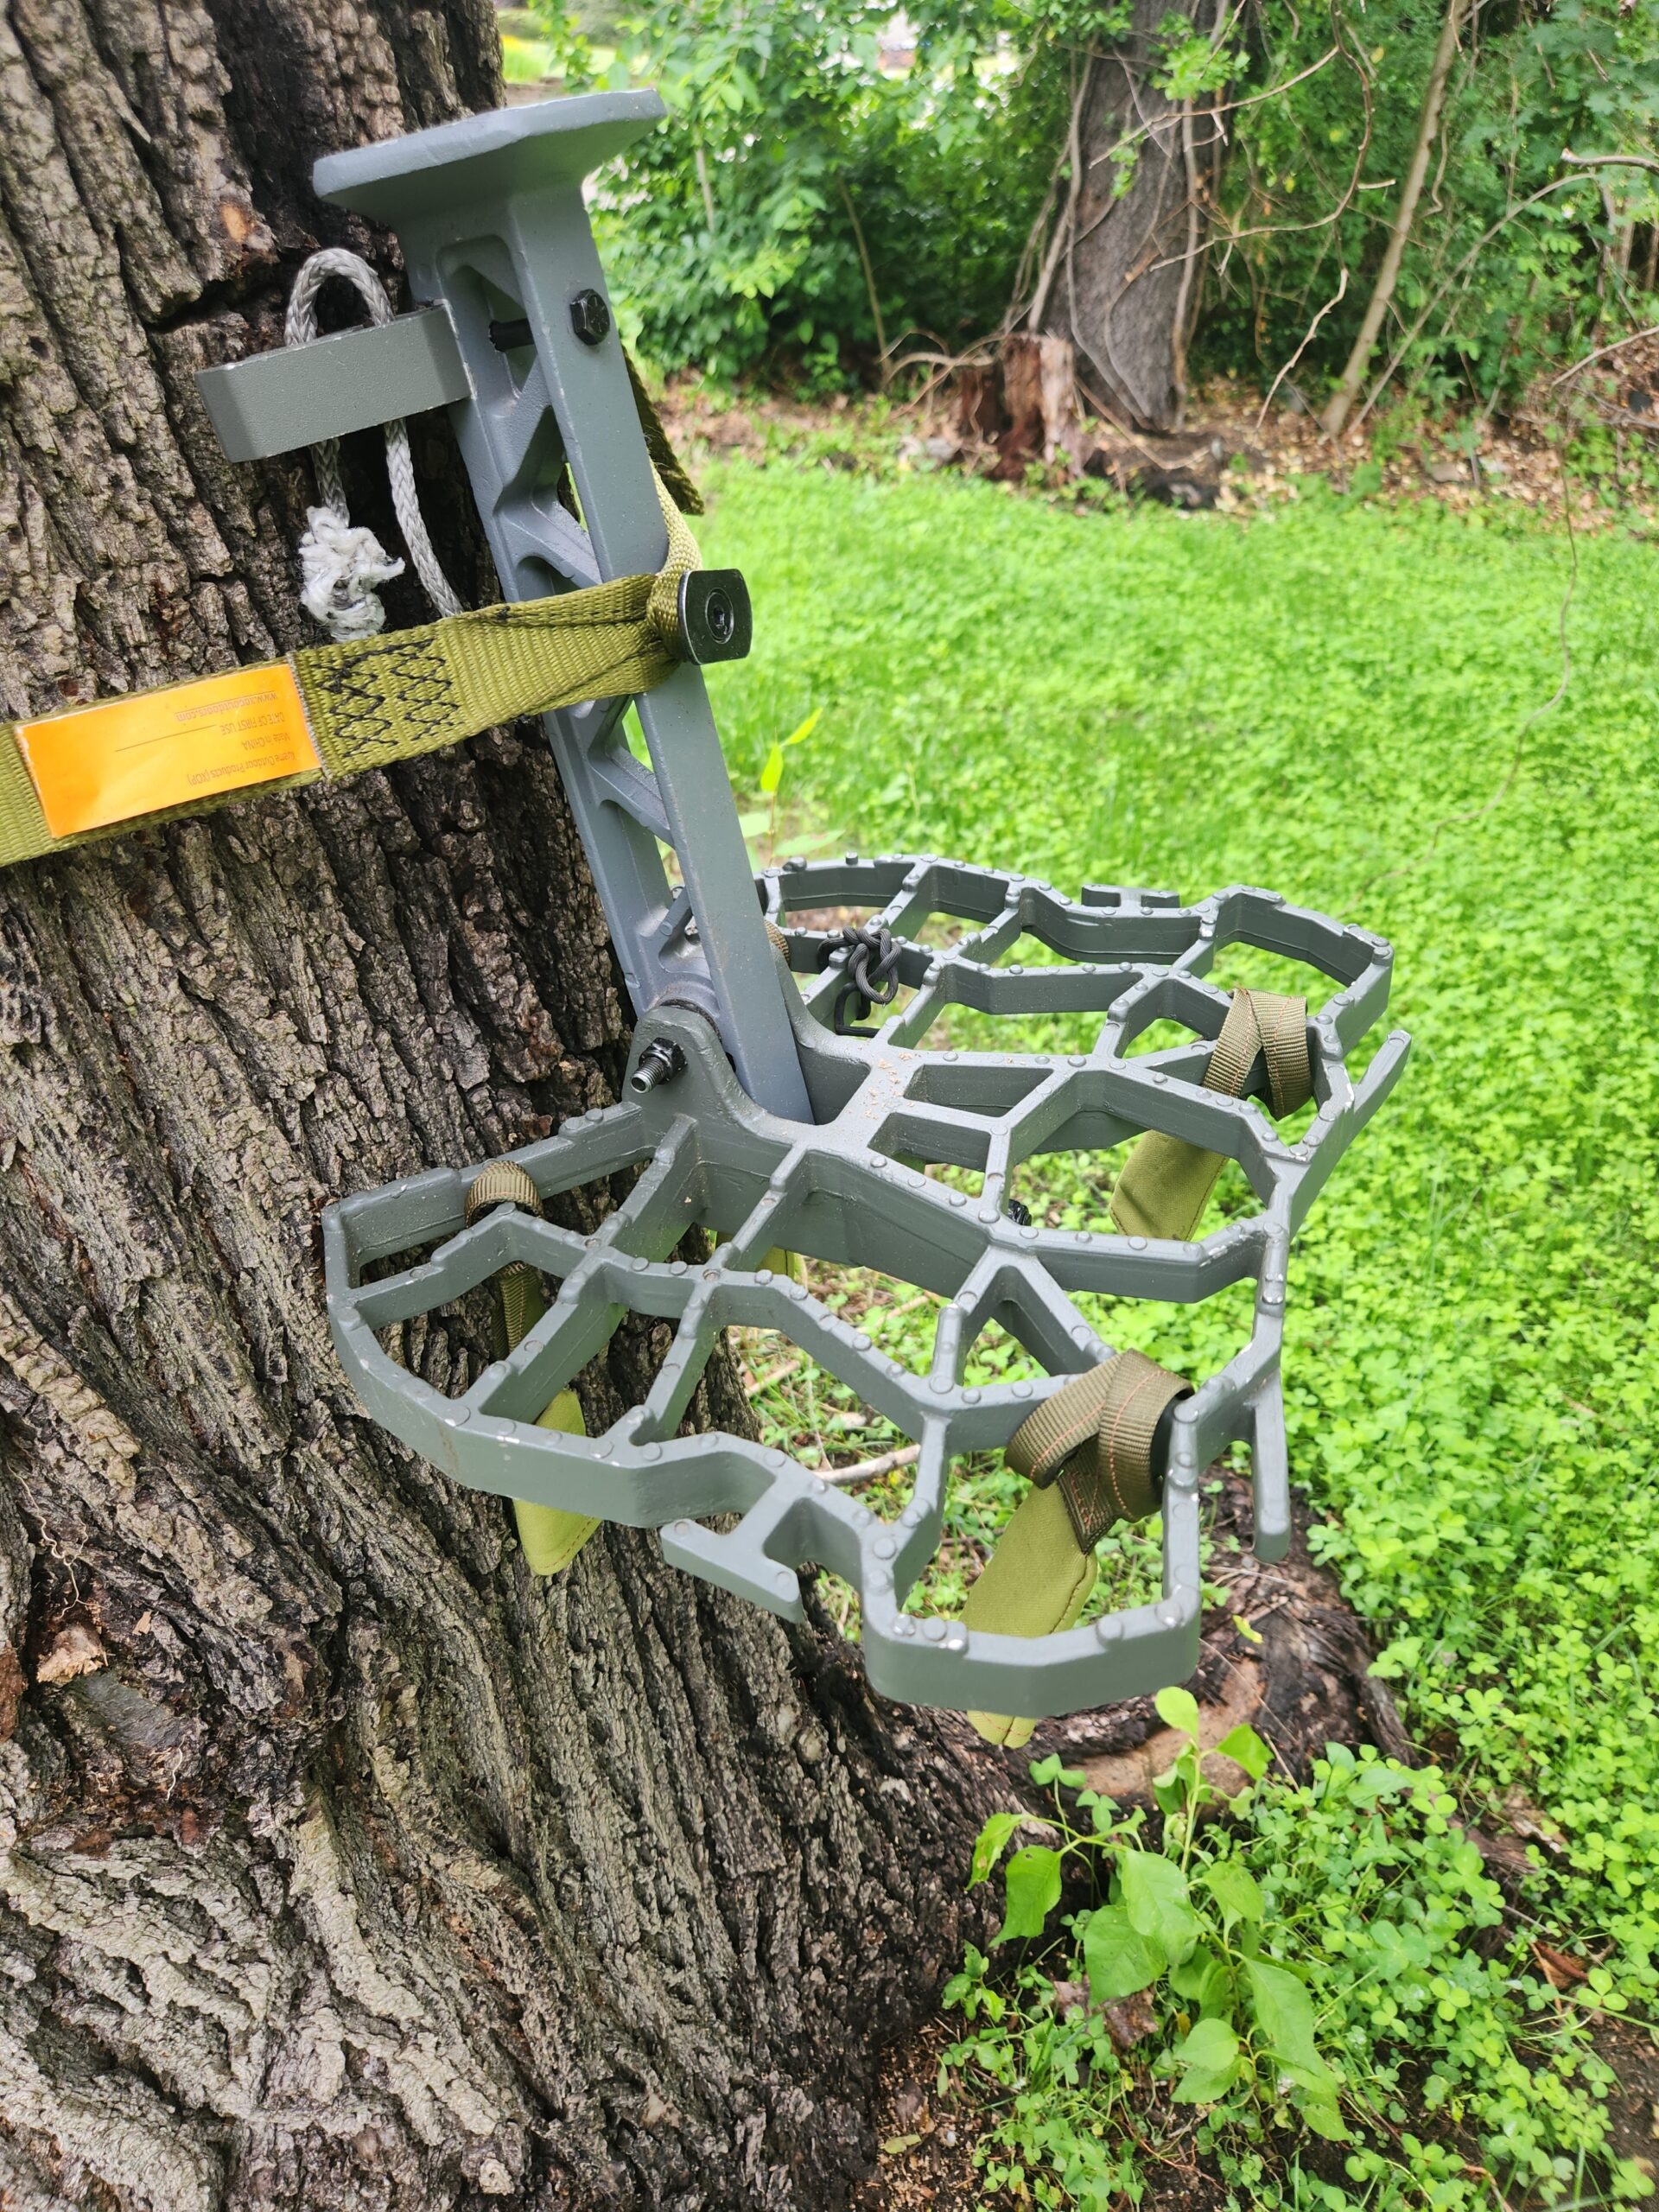
  1. Climbing Stick: While there are various options available in the market, for building your own one-stick, an API climbing stick or similar brand is recommended. These lightweight and sturdy sticks provide excellent stability and versatility.
  2. Cam Cleat: A cam cleat is an important component of the one-stick setup as it allows for quick adjustment and secure attachment of your ropes while climbing. Ensure you select a durable cam cleat that can withstand repeated use.
  3. Rope: High-quality rope is critical for both safety and functionality during one-stick saddle hunting. Consider using Sterling rope or similar brands, known for their strength, durability, and low stretch properties.
  4. Aiders: Aiders are straps with steps that aid in ascending trees by providing footholds as you climb up your stick. Two-step aiders made from Amsteel rope are commonly used in one-stick setups.
  5. Tethers or Ropes: Tethers or ropes are essential for securing yourself to the tree while climbing up or descending down using the one-stick method. Choose reliable ropes with adequate strength to support your weight.
  6. Miscellaneous Items: Other important items include loopable gear ties, elastic cords, paracord, and any additional hardware that may be required for attaching various components together securely.

As you gather your gear, it’s crucial to carefully inspect each item before use to ensure they are in optimal condition. A well-maintained and reliable equipment setup is vital for a safe and successful one-stick saddle hunting experience.

With the right gear at your disposal, you’ll be ready to move on to the next section where we’ll guide you through the step-by-step process of building your own one-stick using these essential components.

Building Your Own One-Stick for Saddle Hunting

Building your own one-stick is an exciting and rewarding endeavor that will provide you with a customized tool tailored to your specific hunting needs. Follow the step-by-step guide below to construct a sturdy and reliable one-stick:

One Stick Build For Saddle Hunting
  1. Gather Your Materials: Before getting started, ensure you have all the necessary materials at hand. This includes an API climbing stick or similar, a cam cleat, high-quality rope (such as Amsteel),aiders, tethers/ rappel ropes.
  2. Inspect Your Climbing Stick: Check your climbing stick for any damage or defects that could compromise its strength and stability. Ensure it is in excellent condition before proceeding. If you use an API stick cut it down to the preferred length that you want. Generally 17-18 inches is a good length between steps.
  3. Prepare the Harken Cam Cleat Attachment: Begin by replacing the existing attachment on your climbing stick’s versatile button with the cam cleat. Drill two holes using the template provided with the Harken cam cleat. Use appropriate grade nuts and bolts such to securely position and fasten the cam cleat onto the stick. Depending which way you attach the Harken cam cleat will determine which way you will always deploy the rope around the tree.
  4. Install Amsteel Rope. Slide eye of rope down the stick. A 7.5ft finished length, 3/16″ full bury Amsteel rope is used with the Harken 150 cam cleat. Rope has a tight eye designed to slide over a 1″ tube such as the Api climbing stick that I use. It can also be girth hitched if used with a Hawk Helium or Shikar stick. Finish with a stopper knot.
  5. Construct Aiders: Using Amsteel rope (around 1/8 inch), create two-step aiders by measuring out segments of equal length for each step—usually around 17 inches long—and forming tight loops using locking brummel knots or other suitable techniques. I personally use the two step UltimAider that’s available on online. It’s fully adjustable allowing you to set the steps at the exact distance apart you want.
  6. Attach Aiders to Climbing Stick: Connect each aider securely to designated spots on your climbing stick using girth hitch knots or other recommended methods for optimal stability during ascents. The UltimAider fits securely on the bottom step of an Api climbing stick.
  7. Loop Handle for Top of Stick. On the top of your climbing stick you will want to add a loop of sorts allowing you to grab the stick to move up to the next position while climbing. I use coated picture hanging wire. It allows it to keep its shape but still pliable enough to bend it. Gear ties will also work.
  8. Prepare Tethers/Ropes: Cut lengths of high-quality rope according to your desired tethering length requirements while factoring in safety considerations such as securing yourself to the tree when ascending or getting around branches using the one-stick technique. Generally speaking an 8ft rope should do the trick.
  9. Secure Additional Components: Utilize loopable gear ties, elastic cords, paracord, or other suitable means to secure loose ends, prevent tangling or noise-causing movements of the ropes/gear that can alert game deer during hunts.
Quick video of how to make a One Stick

By following these step-by-step instructions and leveraging your creativity as needed, you’ll be able to craft a sturdy and effective one-stick tailored specifically for your saddle hunting adventures. Remember always to prioritize safety throughout the construction process and double-check each component’s reliability before stepping into the field.

In the next section, we will guide you through utilizing your newly-built one-stick effectively in saddle hunting scenarios—mastering the technique for improved mobility and success.

The One-Stick Saddle Hunting Technique

Now that you have successfully built your own one-stick, it’s time to master the technique of using it effectively for saddle hunting. Follow the step-by-step guide below to make the most out of your one-stick setup:

  1. Choose an Ideal Tree: Select a suitable tree that provides a clear line of sight and meets safety requirements for climbing. Look for sturdy branches and check for any potential hazards or obstacles.
  2. Attach Tethers/Rappel Rope Correctly: Connect your tethers/rappel rope securely to both your bridge and the designated attachment points on the tree, ensuring they are snug and on correctly.
  3. Test Stability: Test the stability of your climbing stick by applying downward pressure to set the climbing stick to ensure it is firmly anchored before placing weight on it.
  4. Ascend Using Aiders: Place one foot in each aider loop as you climb and utilize them as stepping platforms while moving upward along with the climbing stick. Keep your toes facing the middle of the tree at all times when using an aider. If you DO NOT do this the aider will kick out on you causing you to fall.
  5. Maintain Three Points of Contact: Always maintain three points of contact when ascending—two feet on aiders/climbing stick steps, and one hand holding onto either raiders or the step of the climbing stick for added stability.
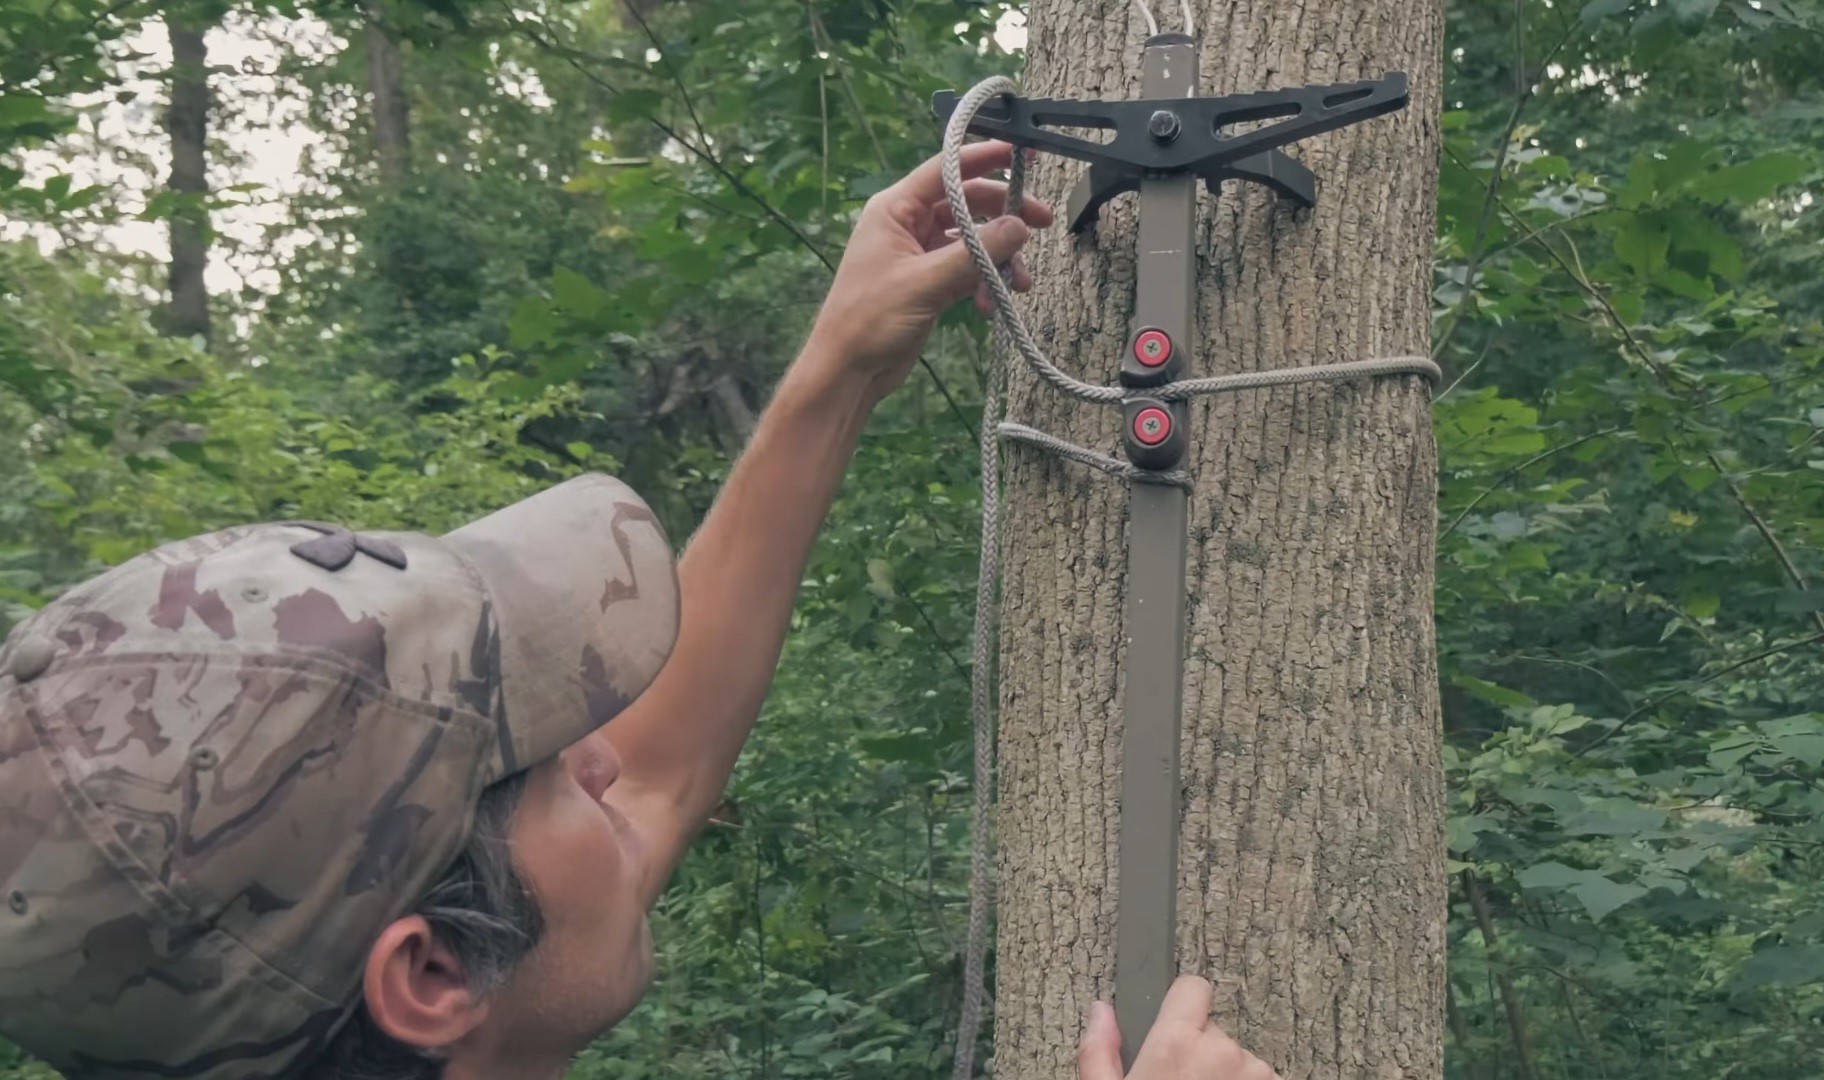
  6. Reposition Your Stick: As needed, place all your weight into your saddle and tether, and reach down and unhook your one-stick from its current position and reattach it at a higher point on the tree by securing it using the Harken cam cleat. The loop you created earlier will make this process easier to reach down and grab your stick.
  7. Repeat Until Desired Height is Reached: Continue ascending by repeating steps 5-7 until you reach your desired height for hunting purposes or scouting vantage points alike.
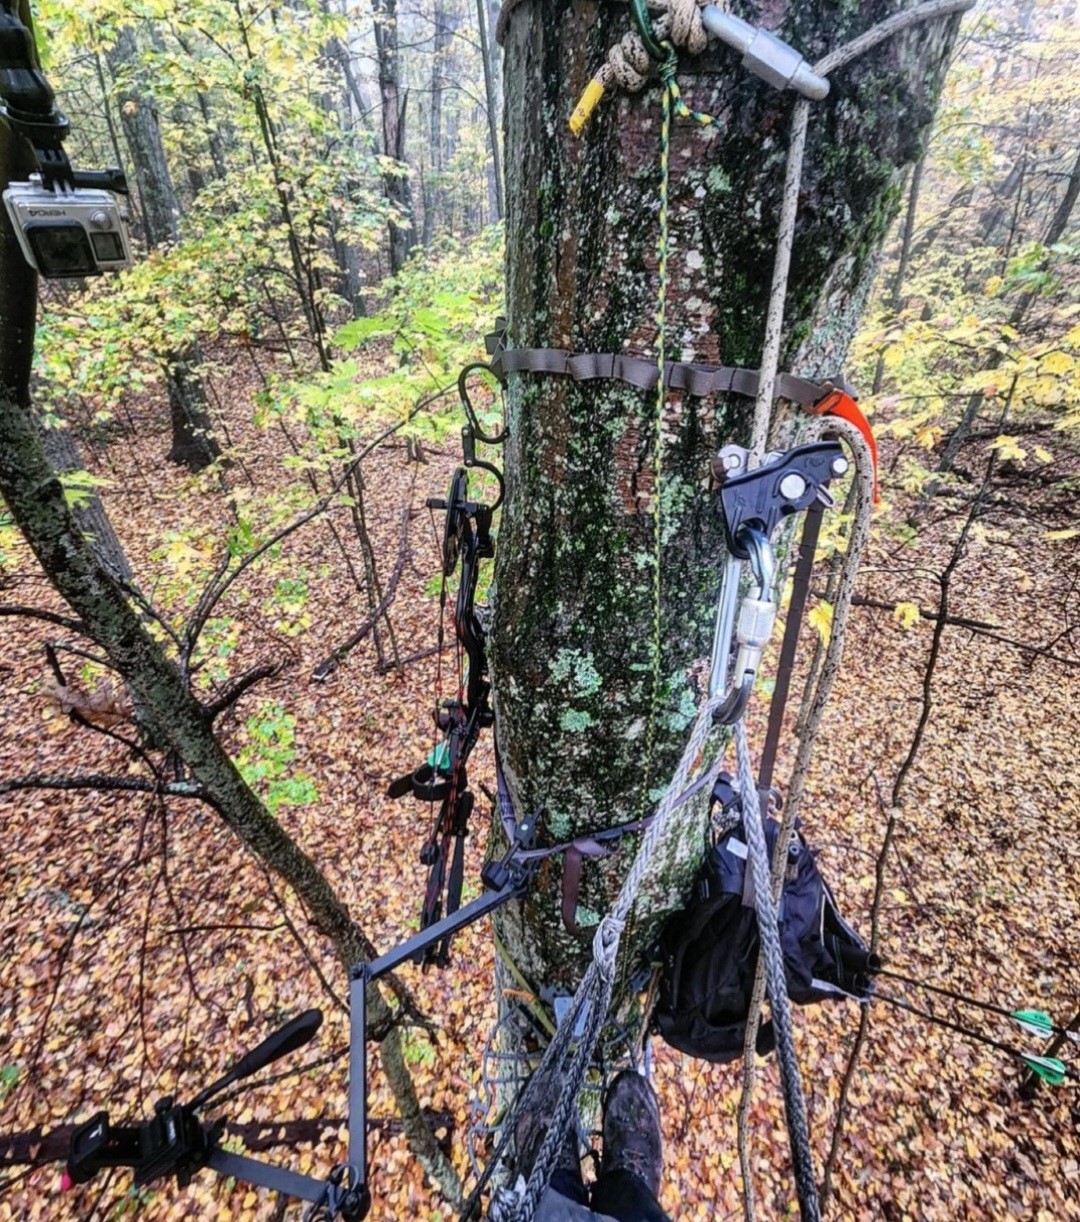
  8. Ensure Secure Positioning: Once you’ve reached your desired height, ensure that your climbing stick is securely fixed in place before shifting your focus to hunting or observation. At this point I set up my XOP Edge platform to hunt from while others may use the one stick to hunt off of.
  9. Movement and Adjustments: Utilize the flexibility of your one-stick setup to freely move around the tree as necessary for optimal positioning during hunts while maintaining safety precautions at all times.
  10. Descend Safely: When it’s time to descend this is where the fun starts. If you did not climb using your rappel rope it’s time to switch over to it while still being connected to your tether. This allows for constant connection to the tree and safety at all times. This is why one sticking is considered one of the safest ways to hunt. At no point are you ever not connected to the tree. Now rappel down the tree using a madrock safeguard.
Demo using the Tethrd Lockdown showing how to One Stick

By following these step-by-step instructions and integrating best practices, you’ll quickly become proficient in utilizing the one-stick technique for saddle hunting. Remember to practice ascending and descending using your one-stick setup in controlled environments first before taking it out into actual hunting scenarios. Make all the steps become second nature from practicing so much.

In the next section, we will discuss both the advantages of one-stick saddle hunting and highlight some potential disadvantages and challenges that come with this technique.

Pros and Cons of One-Stick Saddle Hunting

As with any hunting technique, one-stick saddle hunting comes with its own set of advantages and disadvantages. Understanding these can help you make an informed decision about whether this method aligns with your hunting style and preferences.

Advantages of One-Stick Saddle Hunting

  1. Enhanced Mobility: The one-stick technique offers increased mobility and flexibility, allowing you to quickly adapt to changing hunting conditions or move to different locations without the need for bulky equipment.
  2. Minimalist Approach: By utilizing a single climbing stick, you reduce the overall weight and gear load compared to traditional ladder stands or multiple-climbing-sticks setups, making it easier to navigate through dense terrain.
  3. Low Impact on Trees: With a one-stick setup, you minimize permanent markings on trees as opposed to more invasive hunting methods such as screw in steps. This approach reduces environmental impact and preserves the natural habitat.
  4. Quiet Ascents and Descents: Using a one-stick enables silent movements during climbs and descents, minimizing noise that could disturb game animals in their natural habitat—increasing your chances of successful hunts.This is by far one of the biggest advantages for me.
  5. Cost-Effective Solution: Building your own one-stick is generally more cost-effective than purchasing pre-made climbing systems, helping you save money while still enjoying the benefits of enhanced mobility.

Disadvantages and Challenges of One-Stick Saddle Hunting

  1. Skill Development Required: Fully mastering the techniques involved in using a one-stick setup may require some practice before feeling comfortable with ascending, descending, and moving around trees safely.
  2. Risk Factors: Like any elevated activity associated with hunting, there are inherent risks involved. It’s essential to prioritize safety and take proper precautions when using a one-stick setup to prevent accidents or falls.
  3. Equipment Adaptations: Building your own one-stick may require modifications or adjustments depending on the specific climbing stick models and components chosen. Ensuring everything fits properly and functions seamlessly may require additional time and effort.

Despite these potential challenges, many hunters find that the benefits of one-stick saddle hunting outweigh the drawbacks—especially those seeking increased mobility, low-impact approaches, and quieter ascents/descents during their hunts.

Conclusion

In conclusion, building your own one-stick for saddle hunting can significantly enhance your overall experience in the field. By understanding the principles behind this technique, ensuring proper safety measures, gathering the necessary equipment, and following our step-by-step guide for construction and utilization, you’ll be well-equipped to enjoy the benefits of increased mobility while minimizing environmental impact.

Remember that practice makes perfect when it comes to utilizing a one-stick setup effectively. Take time to hone your skills through controlled climbs before heading out into actual hunting scenarios. With dedication and experience, you’ll master this game-changing technique that offers new possibilities in pursuing your passion for outdoor adventure.

So embrace the challenge of building your personalized one-stick setup, explore new terrain with ease and stealthiness—and most importantly—enjoy unforgettable moments as you connect with nature in ways previously unimagined. Happy hunting!

FAQ

  1. Is building my own one-stick difficult? Building your own one-stick requires some DIY skills, but with the right instructions and tools, it can be accomplished by most hunters.
  2. How much does it cost to build a one-stick? The cost of building a one-stick can vary depending on the materials you choose, but it’s generally more affordable compared to buying pre-made climbing systems esp.
  3. Can I use any type of climbing stick for building a one-stick? While there are different brands and models available, it’s best to select climbing sticks that are known for their stability and durability, such as API.
  4. Do I need prior experience in saddle hunting or tree climbing? Having some knowledge or experience in saddle hunting or tree climbing techniques can be advantageous when building and using a one-stick setup. However, beginners can also learn through proper training and practice.
  5. Can I modify the construction steps based on my preferences or equipment availability? Yes, you can make modifications based on your specific needs and available equipment as long as they don’t compromise safety or structural integrity.
  6. How do I ensure my safety while using a one-stick setup? Prioritize safety measures such as properly inspecting gear before each use, wearing a quality hunting saddle, maintaining three points of contact while ascending and staying attached to the tree via a tether or rappel rope.
  7. What advantages does a one-stick offer over traditional multiple-climbing stick setups? A one-stick setup provides enhanced mobility, reduces gear load, and allows for quieter ascents and descents during hunts.
Posted on

Saddle Hunting 101: Tips and Tricks for the New Saddle Hunter

Saddle Hunting Tips

Welcome, fellow hunters, to the exciting world of saddle hunting! In this blog, we will embark on a journey to explore the art of saddle hunting and uncover why it has been gaining popularity among hunting enthusiasts. So grab your gear and get ready for an exhilarating ride!

Saddle hunting is a revolutionary technique that has taken the hunting community by storm. Gone are the days of cumbersome tree stands and limited mobility. With a tree saddle, you can now experience unparalleled freedom, versatility, and stealth in the field. But what exactly is saddle hunting, and why is it becoming the go-to choice for many hunters?

Pros and ConsHunting SaddleTraditional Tree StandGround Blind
MobilityHigh – Lightweight and compact, allowing for easy movement and adjustment.Moderate – Can be moved, but generally heavier and bulkier.Low – Once set up, it’s not meant to be moved frequently.
StealthHigh – Allows for high concealment as the hunter becomes part of the tree.Moderate – Elevated position can provide some concealment, but the stand itself can be visible.High – Well-designed blinds can blend into the environment effectively.
ComfortHigh – Designed for comfort, with weight evenly distributed. Adjustable for personalized fit.Moderate – Comfort can vary greatly depending on the design and quality of the stand.High – Can be equipped with chairs and allows for movement within the blind.
VersatilityHigh – Can be used in almost any tree, allowing for versatile hunting locations.Moderate – Requires a suitable tree for setup.High – Can be set up in various locations, not dependent on trees.
Setup TimeModerate – Requires some time to ascend the tree and secure the saddle.Moderate to High – Requires time to safely secure the stand to the tree.Low to Moderate – Pop-up blinds can be set up quickly, but others may require more time.
View/VisibilityHigh – 360-degree view when set up correctly.High – Provides an elevated view of the surroundings.Moderate – View is limited to the blind’s windows.
Comparison table of saddle vs traditional tree stand vs ground blinds

Saddle hunting is all about breaking free from traditional tree stands and ground blinds. Instead of being confined to a static position, you become one with the tree, harnessing its natural cover and using it as your vantage point. By wearing a specially designed saddle and utilizing climbing sticks, you gain the ability to move with ease, adapt to changing conditions, and access hard-to-reach areas where game thrives.

Now, let’s dive deeper into the world of saddle hunting and uncover its many benefits. From choosing the right gear to mastering shooting techniques from a saddle, we’ll cover everything you need to know to enhance your hunting experience.

But before that, let’s take a moment to appreciate the importance of practicing with your gear. Just like any new technique or equipment, mastering saddle hunting requires time and dedication. By familiarizing yourself with your saddle, practicing different shooting positions, and honing your climbing skills, you’ll gain confidence in the field and maximize your chances of success.

Are you ready to revolutionize your hunting game? Join us as we embark on an adventure filled with tips, tricks, and insider knowledge that will elevate your hunting experience to new heights. Let’s embrace the thrill of saddle hunting together!

Understanding Saddle Hunting

What is saddle hunting?

Saddle hunting, in its essence, is a game-changer for hunters seeking a dynamic and versatile approach to their pursuit. It involves utilizing a specialized tree saddle or saddle hunting system that allows you to suspend yourself from the tree trunk, providing an elevated position for scouting and hunting.

Unlike traditional treestands that restrict your movement and limit your field of view, a saddle allows you to freely maneuver around the tree, adapting to the ever-changing conditions of your surroundings. By wearing the saddle and using climbing sticks to ascend the tree, you gain the ability to position yourself strategically for optimal concealment and shot opportunities.

The benefits of saddle hunting

  1. Enhanced mobility: Saddle hunting grants you unparalleled freedom in the field. You can quickly adjust your position, change trees if needed, and explore different areas without the hassle of moving heavy treestands. This mobility opens up new possibilities for finding prime hunting spots and pursuing elusive game.
  2. Stealth and versatility: Saddle hunters are masters of stealth. By hugging the tree trunk, blending into your surroundings becomes effortless. This close proximity to a tree minimizes your profile and scent dispersal, increasing your chances of remaining undetected by any deer. Additionally, the ability to shoot from various angles gives you an advantage when faced with challenging shooting situations.
  3. Comfort and adaptability: Saddle hunting systems are designed with comfort in mind. With adjustable straps and padding, you can customize the fit to suit your body shape and size. Unlike traditional stands that often leave you feeling cramped or uncomfortable during long hunts, a well-fitted saddle allows for extended hours of sitting or standing without sacrificing comfort.
  4. Portability and ease of setup: Saddle hunting systems are lightweight and compact compared to bulky treestands. They can be easily be worn or carried in a backpack, making them ideal for hunters on the move. Setting up a saddle is a breeze, and with practice, you’ll become efficient at securing yourself to the tree and preparing for the hunt.
  5. Access to challenging terrain: Saddle hunting opens up a world of possibilities in rugged and hard-to-reach terrain, especially when it comes to hunting public land. Whether you’re navigating dense forests, steep slopes, or swamplands, a saddle allows you to access areas where other hunters can’t reach and traditional stands are impractical. This adaptability gives you an edge when targeting trophy deer.

So, if you’re ready to take your hunting experience to new heights, saddle hunting might be the perfect choice for you. Embrace the freedom, stealth, and versatility that this technique offers and get ready for unforgettable adventures in the great outdoors!

Choosing the Right Gear

When it comes to saddle hunting, selecting the right gear is crucial for a successful and enjoyable experience. In this section, we’ll discuss the importance of investing in good climbing sticks and provide an overview of popular saddle hunting systems, including the renowned Tethrd Lockdown.

The all new Tethrd Lockdown

Importance of investing in good climbing sticks

Climbing sticks are an essential component of your saddle hunting setup. They provide a safe and efficient means of ascending and descending trees, allowing you to reach your desired hunting height. Here’s why investing in high-quality climbing sticks is paramount:

  1. Safety: Climbing sticks should be sturdy and reliable to ensure your safety while climbing trees. Look for sticks made from durable materials like aluminum or steel that can support your weight without compromising stability.
  2. Ease of use: Opt for climbing sticks that are lightweight and easy to transport. Consider factors such as length, weight, and attachment mechanisms when selecting your climbing sticks, as they can significantly impact your overall hunting experience.
  3. Versatility: Choose climbing sticks that can adapt to various tree sizes and shapes. Look for adjustable options or those with interchangeable sections that allow you to customize the height and configuration based on the tree you’re targeting.
  4. Quiet operation: Stealth is key in saddle hunting, so opt for climbing sticks that minimize noise during setup and takedown. Look for features like silent attachment points or rubberized coatings that dampen any potential clanking sounds.

Remember, practicing with your climbing sticks before the hunting season is essential to familiarize yourself with their operation and ensure a smooth ascent and descent during your hunts.

One highly regarded saddle in the market is the Tethrd Lockdown. This innovative system has gained significant attention among hunters due to its exceptional design and functionality. Let’s take a closer look at some key features:

  • Lockdown Saddle: The Lockdown Saddle is the heart of the system, providing comfort, adjustability, and security. It incorporates an expanding saddle body with one-inch elastic webbing called the Lockdown Links, ensuring a secure and customizable fit for various body types.
  • Lockdown Pockets: These spacious and streamlined pockets are permanently attached to the saddle, offering easy access to your hunting gear. With zippered pockets, stretch pockets, and double slit pockets, you can keep your essentials organized and within reach.
  • Utila Bridge 2.0: The Utila Bridge 2.0 is a versatile bridge system that provides seven points of adjustment for optimal comfort and positioning. Its secure design allows for smooth movement while maintaining stability during your hunts.
  • Leg Straps: The Tethrd Lockdown system features leg straps equipped with micro Cobra Buckles for easy use and adjustability. These straps ensure a secure fit and accommodate standard one-inch webbing.

The Tethrd Lockdown system is just one example of the many saddle hunting systems available on the market. Each system offers unique features and advantages, so it’s essential to research different options and choose one that suits your specific needs and preferences.

Investing in high-quality climbing sticks and selecting a reliable saddle hunting system like the Tethrd Lockdown will set you up for success in your saddle hunting adventures. So gear up, choose wisely, and get ready to experience the thrill of hunting from a whole new perspective!

Safety in Saddle Hunting

When it comes to saddle hunting, safety should always be a top priority. In this section, we’ll emphasize the importance of using a lineman’s belt and provide tips on how to feel secure and safe while in the saddle.

Importance of using a lineman’s belt

A lineman’s belt is an essential piece of equipment that ensures your safety while ascending and descending trees. Here’s why it’s crucial to utilize a lineman’s belt during saddle hunting:

  1. Fall protection: A lineman’s belt serves as a safety tether, keeping you securely attached to the tree at all times. It prevents accidental falls and provides peace of mind, especially when navigating challenging trees or dealing with unexpected movements.
  2. Stability and balance: The lineman’s belt acts as a support system, allowing you to maintain stability and balance while climbing or adjusting your climbing sticks. It provides an additional point of contact with the tree, reducing the risk of slipping or losing your footing.
  3. Hands-free operation: By utilizing a lineman’s belt, you can keep your hands free for tasks such as attaching gear, adding your next level of climbing sticks, or handling equipment without compromising your safety.

Remember to always attach the lineman’s belt properly and ensure it is secured tightly around the tree before starting to climb. Practice using the lineman’s belt during your training sessions to familiarize yourself with its operation and build confidence in its effectiveness.

How to feel secure and safe in the saddle

Feeling secure and safe in the saddle is essential for a successful hunting experience. Here are some tips to help you achieve that:

  1. Proper setup: Take the time to set up your saddle correctly, following the manufacturer’s instructions. Ensure that all straps are tightened securely but comfortably around your body, providing a snug fit.
  2. Regular inspections: Before each hunt, thoroughly inspect your saddle, climbing sticks, and lineman’s belt for any signs of wear or damage. Replace any worn-out or faulty components to maintain optimal safety.
  3. Practice and familiarity: Practice using your saddle and climbing system before the hunting season begins. Familiarize yourself with the operation of each component, including attaching and detaching yourself from the tree. Regular practice builds muscle memory and confidence in your equipment.
  4. Maintain situational awareness: While in the saddle, always remain aware of your surroundings. Pay attention to branches, obstacles, or potential hazards that may affect your safety. Stay focused on maintaining balance and stability at all times.
  5. Communicate your intentions: If hunting with a partner who may be filming, communicate your movements and intentions while in the saddle to avoid any potential accidents or misunderstandings.

By implementing these safety measures and prioritizing your well-being, you can fully enjoy the benefits of saddle hunting while minimizing risks. Remember, safety should never be compromised in pursuit of a successful hunt.

Stay secure, stay safe, and embrace the thrill of saddle hunting with confidence!

Mastering the Art of Silence and Scent Control

In saddle hunting, mastering the art of silence and scent control is paramount to outsmarting a deer. The ability to move silently and remain undetected by keen senses can make a significant difference in your hunting success. In this section, we’ll provide you with detailed tips for staying silent during the hunt and highlight the importance of scent control in saddle hunting.

Tips for staying silent during the hunt

  1. Clothing selection: Opt for clothing made from quiet and lightweight materials, specifically designed for hunting. Avoid garments that rustle or create unnecessary noise when moving. Additionally, consider using noise-dampening accessories like stealth strips to minimize equipment noise.
  2. Slow and deliberate movements: Move slowly and deliberately when positioning yourself in the saddle or adjusting your gear. Quick and jerky movements can create unnecessary noise that may alert any near by deer.
  3. Minimize gear clatter: Secure loose items on your person or in your backpack to prevent them from rattling or making noise as you move. Use gear organizers or pouches to keep essential items organized and easily accessible without fumbling or creating unnecessary noise. Avoid any metal on metal contact.
  4. Choose quiet attachment methods: Opt for quiet attachment methods when securing gear to your saddle or platform. Consider using rubber-coated hook or gear ties with noise-dampening properties instead of metal buckles or clips that may clang against each other.
  5. Practice stealthy footwork: Take deliberate steps when climbing with climbing sticks. Place each foot carefully, avoiding unnecessary contact with noisy branches or vegetation that may be near by.
  6. Utilize natural cover: When setting up within shooting range of game animals, use natural cover such as the trees foliage to break up your silhouette and mask any movement you make.
  7. Stay vigilant: Continuously scan your surroundings with your eyes for signs of movement without moving yourself. By remaining alert, you can spot deer early and adjust accordingly.

Importance of scent control in saddle hunting

Scent control is critical in saddle hunting as deer possess a keen sense of smell that can detect even the slightest human odor. Here’s why scent control is crucial:

  1. Avoid detection: Deer rely heavily on their sense of smell to detect potential threats. By minimizing your scent, you increase your chances of going undetected and getting closer to your target.
  2. Maintain stealth: Scent control is an integral part of maintaining overall stealth during the hunt. Even if you are silent and well-concealed, a strong human odor can still give away your presence.
  3. Maximize opportunities: By controlling your scent, you reduce the likelihood of spooking deer before they come within shooting range. This increases your chances of a successful shot opportunity.

To effectively control scent in saddle hunting, consider implementing the following practices:

  • Scent-free clothing: Wear scent-blocking clothing designed specifically for hunting to minimize human odor.
  • Scent elimination products: Use scent elimination sprays, soaps, and detergents to remove human odors from your body and gear.
  • Storage precautions: Store your hunting clothing and gear in scent-controlled containers or bags to prevent contamination by foreign odors.
  • Wind awareness: Pay close attention to wind direction and plan your approach or hunting location accordingly. Position yourself upwind from areas where game animals are likely to appear.
  • Avoid unnecessary contact: Minimize contact with foreign odors such as gasoline, tobacco smoke, or strong perfumes before and during the hunt.

By incorporating these scent control measures into your saddle hunting routine, you’ll greatly increase your chances of remaining undetected by game animals and maximize your hunting opportunities.

Remember, silence and scent control go hand in hand in the pursuit of a successful hunt. Mastering these skills will elevate your saddle hunting experience and bring you closer to your desired trophy game.

Shooting from the Saddle

Shooting from a saddle requires a slightly different approach compared to shooting from a traditional treestand. In this section, we’ll explore the key differences between shooting from a saddle and a stand and provide you with valuable tips and techniques for practicing shooting from the saddle.

How shooting from a saddle differs from shooting from a stand

  1. Stability: Shooting from a saddle requires you to maintain stability while suspended in the air. Unlike a treestand, which provides a solid platform, a saddle allows for more movement. Therefore, it’s crucial to practice maintaining balance and stability while taking shots.
  2. Range of motion: Saddle hunting offers greater freedom of movement, allowing you to shoot in various directions around the tree trunk. This versatility enables you to take advantage of shot opportunities that may arise unexpectedly.
  3. Shooting positions: In a saddle, you can shoot while standing, sitting, or even leaning against the tree trunk. Experiment with different shooting positions to find what works best for your comfort and accuracy.
Practicing shooting from my Tethrd Saddle

Tips and techniques for practicing shooting from the saddle

  1. Develop muscle memory: Practice drawing your bow or shouldering your firearm repeatedly while in the saddle. This helps develop muscle memory and familiarity with shooting positions, ensuring smooth and efficient movements during actual hunts.
  2. Utilize your tether: Adjusting the height of your tether can impact your shooting position and stability. Experiment with different tether heights to find the most comfortable and effective position for accurate shots.
  3. Lean into the tree: When taking shots, lean into the tree trunk for added stability and support. This technique helps minimize any unwanted sway or movement that could affect your aim.
  4. Practice 360-degree shooting: Set up targets at various angles around the tree to simulate real hunting scenarios. Practice shooting in all directions, including behind you, using techniques like turning into your tether to spin onto your strong side shoulder.
  5. Perfect your shot execution: Focus on maintaining proper form, steady aim, and smooth trigger control while shooting from the saddle. Consistent practice will help you refine your shooting skills and increase accuracy.
  6. Consider equipment adjustments: Depending on your shooting style and preferences, you may need to adjust your equipment. For example, you might need to modify the length of your release aid or experiment with different anchor points to accommodate shooting from the saddle.
  7. Shoot from different distances: Practice shooting from various distances to become proficient at judging ranges accurately. This skill is crucial for making ethical shots during real hunting situations.

Remember, practicing shooting from the saddle is essential to build confidence and proficiency. Set up a dedicated practice area in your backyard or at a safe location where you can regularly hone your shooting skills and become comfortable with shooting positions unique to saddle hunting.

By incorporating these tips and techniques into your practice sessions, you’ll be well-prepared for the challenges of shooting from a saddle when it truly counts in the field.

Keep practicing, stay focused, and enjoy the excitement of taking accurate shots while suspended among the trees!

Developing a Saddle Hunting System

To excel in saddle hunting, it’s essential to develop a routine and system that works best for you. In this section, we’ll guide you on how to develop a routine for saddle hunting and provide valuable tips for practicing and refining your system.

How to develop a routine for saddle hunting

  1. Plan ahead: Before each hunt, thoroughly plan your approach, considering factors such as wind direction, game patterns, and potential shooting opportunities. This preparation ensures that you’re well-prepared and maximizes your chances of success.
  2. Practice regularly: Dedicate time to regular practice sessions with your saddle hunting equipment. Familiarize yourself with the setup process, climbing techniques, shooting positions, and gear organization. Regular practice builds confidence and helps refine your skills.
  3. Experiment with gear placement: Develop a consistent system for organizing your gear within easy reach while in the saddle. Experiment with different pouches, pockets, or attachment methods to optimize efficiency and minimize noise during hunts.
  4. Maintain equipment: Regularly inspect and maintain your saddle hunting equipment to ensure everything is in proper working order. Replace any worn-out or damaged components promptly to avoid any surprises in the field.
  5. Refine your process: Continuously evaluate your system and look for areas of improvement. Seek feedback from experienced saddle hunters, join online communities or forums to learn from others’ experiences, and adapt your routine based on what works best for you.

Tips for practicing and refining your system

  1. Start early: Begin practicing with your saddle hunting system well before the hunting season begins. This allows ample time to familiarize yourself with the equipment, identify any issues or adjustments needed, and build confidence in your abilities.
  2. Simulate real hunting conditions: Set up a practice area that closely resembles the terrain you’ll encounter during hunts. Incorporate obstacles, different tree types, and shooting scenarios to simulate real hunting conditions and enhance your adaptability.
  3. Experiment with different trees: Practice setting up your saddle on various tree species and sizes. This experience will help you refine your technique and adapt to different tree structures, ensuring a secure and comfortable setup every time.
  4. Seek feedback: Consider filming your practice sessions or having a knowledgeable observer provide feedback on your form, equipment placement, or shooting technique. These insights can help identify areas for improvement and fine-tune your system.
  5. Evaluate comfort: Pay attention to any discomfort or pressure points that arise during practice sessions. Adjust your saddle, padding, or tether height to alleviate discomfort and ensure long-lasting comfort during extended hunts.
  6. Test gear organization: Practice accessing different gear items quickly and quietly while in the saddle. Experiment with different attachment methods or pouch layouts to optimize efficiency and minimize noise during hunts.
  7. Hunt-specific practice: Prioritize practicing scenarios specific to your hunting style, such as shooting from elevated positions or executing shots quickly from different angles. Tailor your practice sessions to replicate the challenges you’re likely to encounter during hunts.

By developing a routine and consistently practicing with your saddle hunting system, you’ll become more proficient, confident, and efficient in the field. Regular refinement of your process ensures that you’re always adapting and maximizing your chances of success.

So, embrace the journey of developing your saddle hunting system, stay dedicated to practice, and enjoy the rewards of a well-honed routine when it’s time to embark on thrilling hunting adventures!

Conclusion

Congratulations on completing this comprehensive guide to saddle hunting! We’ve covered a wide range of topics, from understanding saddle hunting to choosing the right gear, ensuring safety, mastering silence and scent control, shooting from the saddle, and developing a personalized hunting system. Let’s recap the key points before we conclude.

Saddle hunting offers a revolutionary approach to hunting that provides increased mobility, versatility, and stealth in the field. By utilizing a specialized tree saddle or saddle hunting system, you can navigate challenging terrain, access hard-to-reach areas, and remain undetected by deer.

Investing in good climbing sticks is essential for safe and efficient ascents and descents. Look for lightweight, sturdy sticks that adapt to various tree sizes and minimize noise during setup.

Popular saddle hunting systems like the Tethrd Lockdown offer exceptional comfort, adjustability, and functionality. Explore different options to find the system that best suits your needs.

Safety should always be a top priority in saddle hunting. Utilize a lineman’s belt for fall protection and practice proper setup techniques to ensure a secure and safe experience.

Mastering the art of silence and scent control is crucial for remaining undetected by game animals. Choose quiet gear, move deliberately, and implement scent control practices to maximize your chances of success.

Shooting from a saddle requires adjustments in stability, range of motion, and shooting positions compared to shooting from a stand. Practice regularly to develop muscle memory, utilize your tether effectively, and perfect your shot execution.

Developing a routine for saddle hunting involves planning ahead, regular practice sessions, refining your gear organization process, and seeking feedback from experienced hunters. Continuously evaluate and adapt your system based on what works best for you.

In conclusion, we encourage you to try saddle hunting if you haven’t already done so. Embrace the freedom, versatility, and excitement it offers. With dedication and practice, you’ll enhance your hunting experience and open up new possibilities in the pursuit of game.

So, gear up, hone your skills, and venture into the world of saddle hunting. Unleash your potential as a hunter, and may your future hunts be filled with thrilling moments and successful harvests!

Happy saddle hunting!

FAQs

Q1: Is saddle hunting safe? A1: When done correctly and with proper safety precautions, saddle hunting can be safe on of the safest means of hunting. It’s important to invest in high-quality gear, practice using your equipment, and always prioritize safety by using a lineman’s belt or tether, inspecting your gear regularly, and following proper setup procedures.

Q2: How do I choose the right tree for saddle hunting? A2: Look for healthy, sturdy trees with minimal branches in the desired hunting area. Avoid trees with excessive leaning or visible signs of decay. Additionally, consider the size and shape of the tree to ensure it can accommodate your climbing sticks and provide a secure attachment point for your saddle.

Q3: Can I use a tree saddle for bowhunting and rifle hunting? A3: Absolutely! Saddle hunting systems are versatile and can be used for both bowhunting and rifle hunting. The ability to shoot from various positions in the saddle makes it suitable for different types of weapons and shooting styles.

Q4: How do I practice shooting accurately from a saddle? A4: Regular practice is key to shooting accurately from a saddle. Set up a dedicated practice area where you can simulate real hunting scenarios. Practice shooting from different angles, distances, and shooting positions while focusing on maintaining proper form, aim, and trigger control.

Q5: Can I use a saddle hunting system in all types of terrain? A5: Yes, one of the advantages of saddle hunting is its adaptability to different terrains. Whether you’re navigating dense forests, steep slopes, or swamplands, a properly set up saddle can be used effectively in various types of terrain.

Q6: How do I stay comfortable during long hunts in the saddle? A6: Comfort is crucial during long hunts. Adjust your saddle, padding, and tether height to relieve pressure points and ensure a comfortable fit. Consider using stiff-soled footwear for added support and finding a balance between mobility and comfort.

Q7: Can I use a tree saddle for all-day hunts? A7: Yes, many saddle hunters successfully use their systems for all-day hunts. However, it’s essential to listen to your body and take breaks when needed. Adjust your position, stretch, and stay hydrated to maintain focus and endurance throughout the day.

Q8: How do I clean and maintain my saddle hunting gear? A8: Follow the manufacturer’s instructions for cleaning and maintaining your gear. Use mild soap or scent-free detergents to clean clothing items. Inspect all components regularly for wear or damage, and replace any worn-out parts promptly. Proper maintenance ensures the longevity and optimal performance of your gear.

Remember, if you have any specific questions or concerns about saddle hunting, it’s always best to consult with experienced saddle hunters or reach out to the manufacturers of your gear for guidance.

Happy hunting!

Posted on

Tethrd Lockdown Saddle: Review and First Impressions

Review of the Tethrd Lockdown Saddle First Impressions

Saddle hunting, a method of hunting that combines the stealth of tree stand hunting with the mobility of ground hunting, has been gaining traction among hunters for its unique advantages. This method allows hunters to ascend trees and position themselves in a way that offers an unobstructed shooting lane, all while maintaining a low profile. The growing popularity of saddle hunting can be attributed to its versatility, lightweight gear, and the unique vantage point it provides.

Tethrd Lockdown Saddle One Stick Review First Impressions

In the midst of this growing trend, Tethrd has emerged as a trailblazer, pushing the boundaries of what’s possible in saddle hunting gear. Tethrd is a company built by saddle hunters, for saddle hunters. Their mission is to design and manufacture the most innovative, high-quality products in the industry. They are committed to the relentless pursuit of better gear and better methods, always striving to offer the best to the saddle hunting community.

One of Tethrd’s most innovative products is the LockDown Saddle. This saddle is a game-changer, designed to provide maximum comfort without compromising on functionality. The LockDown Saddle takes the best features from Tethrd’s Phantom, such as the UtiliBridge, Comfort Channels, and integrated lineman loops, and adds an Expandable Saddle Body with LockDown Link construction. This creates a super comfortable saddle that expands and contracts with you throughout your hunt, offering an unparalleled level of comfort and mobility.

In the following sections, we will look into the unique features of the Tethrd LockDown Saddle, and explore why it is quickly going to become  a favorite among saddle hunters.

Unboxing the new Tethrd Lockdown Saddle

The Innovation Behind the LockDown Saddle

When it comes to innovation, Tethrd has truly outdone themselves with the Lockdown Saddle. This remarkable piece of hunting gear is the culmination of years of research, development, and feedback from avid hunters like you and me.

Tethrd has always been at the forefront of saddle hunting, constantly pushing the boundaries of design and functionality. The Lockdown Saddle represents a significant evolution from their previous models, such as the Phantom, introducing a range of unique features that set it apart from the competition.

One of the standout features of the Lockdown Saddle is its proprietary yoke system. This innovative design replaces traditional suspender systems, offering adjustable and removable support for carrying gear. The yoke system ensures that the saddle stays securely in place during walks, eliminating the worry of it slipping down and causing discomfort.

Tethrd Lockdown Saddle Adjustable Panel with Lockdown Links

Another notable feature is the expandable saddle body. Unlike other expandable saddles that can be a hassle to manage, the Lockdown Saddle’s body stays closed when not in use and expands effortlessly when needed. This not only enhances comfort during long sits but also eliminates any pinching or hot spots that can distract you from focusing on the hunt.

But that’s not all – Tethrd has gone above and beyond to ensure that the Lockdown Saddle is as versatile and user-friendly as possible. The integrated dump pouches on the sides of the saddle offer generous storage space and are designed for one-handed operation. With multiple compartments and grommet holes for gear hoists, these pockets provide easy accessibility and organization for all your hunting essentials.

Moreover, the Lockdown Saddle features the Lockdown Haulers, which are permanently attached to the saddle. These slim and streamlined haulers not only provide efficient storage but also eliminate any unnecessary bulk, allowing for a more streamlined and agile hunting experience.

Tethrd has also taken comfort into serious consideration with the Lockdown Saddle. The Comfort Channels, adjustable through a girth hitch system, offer seven points of adjustment, allowing for micro-adjustments and optimal comfort. Additionally, the Lockdown Saddle’s UtiliBridge and Comfort Channels work together to provide stability and prevent sliding during use, ensuring that you can focus on the hunt without any distractions.

With its impressive array of features and attention to detail, the Lockdown Saddle is truly a game-changer in the world of saddle hunting. Tethrd’s commitment to continuous improvement and their dedication to creating innovative gear shines through in every aspect of this exceptional saddle.

In the next section, we’ll take a deep dive into the Lockdown Saddle’s features, examining each one in detail to understand how they enhance your hunting experience. Stay tuned!

Tethrd Linemans Belt Kit

The Lineman Belt is one of the most important pieces of kit in your arsenal. The Lineman Belt safely connects you to the tree while you climb, to help reduce the risk of a fall.

Includes 8′ rope with one 2″ factory-spliced eye, 2 ultra lite carabiners, and prusik cord.

Deep Dive into the LockDown’s Features

Alright, fellow hunters, let’s roll up our sleeves and take a closer look at the incredible features that make the Lockdown Saddle a true game-changer in the world of hunting gear. Get ready to be blown away!

First up, let’s talk about the Lockdown Links. These bad boys are the backbone of the Lockdown Saddle, providing a secure and comfortable fit. The Lockdown Links are not only adjustable but also incredibly durable, ensuring that your saddle stays firmly in place throughout your hunting adventures.

Next on our list are the Lockdown Haulers. These slim and streamlined haulers are permanently attached to the saddle, offering efficient storage without adding any unnecessary bulk. Need to carry extra gear? No problem! The Lockdown Haulers have got you covered with their increased capacity, ensuring that you can bring along all your hunting essentials without compromising on agility. Conveniently enough, I can fit my LoneWolf Pocket Arm in one of the Lockdown Haulers. This is going to allow me to ditch my Mystery Ranch pack and become even more mobile.

LoneWolf Pocket Arm In the new Tethrd Lockdown pouch

Now, let’s talk about the Lockdown Modular Yoke. This innovative feature enhances both comfort and convenience. With the Lockdown Modular Yoke, you can easily adjust the fit of your saddle, ensuring a personalized and comfortable experience. Say goodbye to those days of uncomfortable hunting sessions – the Lockdown Saddle has got your back, quite literally!

But we’re not done yet! The Lockdown Saddle takes customization to a whole new level with its UtiliBridge and Comfort Channels. The UtiliBridge, made from amsteel, can be expanded to relieve hip pinch and pressure, providing you with ultimate comfort during those long sits. And the Comfort Channels? They offer seven points of adjustment, allowing you to fine-tune your saddle’s fit and find that sweet spot of comfort that keeps you focused and ready for the perfect shot.

Oh, and did I mention the expandable saddle body? This feature is a game-changer, my friends. The Lockdown Saddle’s expandable panel provides extra coverage and comfort by cupping the bottom, ensuring that you can stay in your saddle for extended periods without feeling any discomfort. And don’t worry about wear and tear – the included spare elastic retractors ensure that your saddle stays in top-notch condition for many hunting seasons to come. This feature is quite possibly my favorite. I like to sit while waiting on a deer to come through and, with the expandable saddle body, it makes it that much more comfortable.

With its incredible range of features and attention to detail, the Lockdown Saddle truly stands out from the crowd. Tethrd has left no stone unturned in their quest to create the ultimate hunting gear, and it’s safe to say that they’ve hit the bullseye with the Lockdown Saddle.

In the next section, I’ll be sharing my personal experiences and anecdotes of using the Lockdown Saddle, as well as comparing its performance with other saddles in the market. Stay tuned, my fellow hunters, because you won’t want to miss it!

The LockDown Saddle in Action

Now, let me share my brief personal experiences with the Lockdown Saddle and give you a glimpse of why I believe it’s a game-changer in the world of hunting gear. As an avid hunter who got my hands on the Lockdown Saddle as soon as it was released, I can confidently say that it has exceeded all my expectations.

First and foremost, the comfort level of the Lockdown Saddle is off the charts. The adjustable yoke system provides excellent support and ensures that the saddle stays securely in place, even during long walks. No more constantly readjusting or feeling like your gear is weighing you down. With the Lockdown Saddle, I can focus on the hunt without any distractions.

First Impression of the Tethrd Lockdown

The expandable saddle body is a huge upgrade from my previous Tethrd Mantis saddle. It offers extra coverage and comfort, making those extended sits a breeze. I now feel like I will be able to stay in my saddle for hours on end without feeling any discomfort or pressure points. It’s truly a game-changer for those of us who love spending long hours in the field.

One thing I absolutely love about the Lockdown Saddle is the integrated storage pockets. They are incredibly spacious, streamlined, and designed with the hunter in mind. The one-handed operation makes accessing my gear a breeze and, with the multiple compartments, it’s going to allow me to stay organized and have everything I need within arm’s reach. No more fumbling around with two hands or wasting precious hunting time searching for something at the bottom of a pocket.

But don’t just take my word for it. I’ll be releasing demonstration videos soon showing how to one-stick, where you can see the Lockdown Saddle in action. You’ll witness firsthand how easy it is to set up, adjust, and utilize all the innovative features that Tethrd has packed into this incredible saddle. Stay tuned for those videos, as they will truly showcase the Lockdown Saddle’s capabilities.

Review and First Impressions Tethrd Lockdown Saddle For One Stick Saddle Hunting

In terms of performance, the Lockdown Saddle has truly raised the bar. Compared to other saddles in the market, it stands out with its superior comfort, durability, and versatility.

Now, I must mention that the Lockdown Saddle is not just a piece of hunting gear – it’s an investment in your hunting experience. With its top-notch construction, innovative features, and attention to detail, the Lockdown Saddle offers exceptional value for the price. It’s a game-changer that will elevate your hunting game to new heights.

In the next section, we’ll look even deeper into the value of the Lockdown Saddle, comparing its price point with other saddles in the market. So, stay with me as we explore the incredible value that the Lockdown Saddle brings to the table.

The Tethrd HYS Strap is the ultimate public land legal gear hanger. The HYS Strap is made of high strength polyester that enables you to hang your stuff in whatever way makes sense to you. You can easily move your gear and position it wherever it makes sense for your style of hunting.

The Value of the LockDown Saddle

Now, let’s talk about the value that the Lockdown Saddle brings to the table. When it comes to hunting gear, finding the perfect balance between price and quality is crucial. And I must say, the Lockdown Saddle hits the sweet spot.

Considering the innovative features, exceptional comfort, and durability that the Lockdown Saddle offers, its price point is more than justified. Priced right at $429 for the complete system, this saddle is worth every penny. Only $30 more than the Phantom Elite, Tethrd has poured their expertise and passion into creating a saddle that not only meets but exceeds the expectations of serious hunters.

When comparing the Lockdown Saddle with other saddles in the market, it becomes evident that it offers incredible value for money. Its unique features, such as the expandable saddle body, integrated storage pockets, and adjustable yoke system, set it apart from the competition. You won’t find another saddle that combines comfort, functionality, and durability quite like the Lockdown Saddle.

Moreover, let’s not forget the long-term benefits of investing in the Lockdown Saddle. With its top-notch construction and attention to detail, this saddle is built to withstand the rigors of the hunting season. The replaceable elastic ensures longevity, allowing you to enjoy many successful hunts without worrying about wear and tear.

So, if you’re looking for a saddle that offers exceptional value for your hard-earned money, look no further than the Lockdown Saddle. It’s an investment that will enhance your hunting experience for years to come.

In conclusion, the Tethrd Lockdown Saddle is a true game-changer in the world of hunting gear. With its innovative features, unmatched comfort, and exceptional value, it has set a new standard for saddle hunting. Whether you’re a seasoned hunter or just starting your saddle hunting journey, the Lockdown Saddle is a must-have addition to your gear arsenal.

I highly recommend checking out the Lockdown Saddle for yourself. Visit your local Tethrd dealer or head over to their website to learn more and make a purchase. Trust me, once you experience the comfort and functionality of the Lockdown Saddle, you’ll wonder how you ever hunted without it.

So, what are you waiting for? Take your hunting game to the next level with the Tethrd Lockdown Saddle. Happy hunting, my fellow adventurers!

And don’t forget to stay tuned for my upcoming demonstration videos, where I’ll showcase the Lockdown Saddle in action. You won’t want to miss it!

Posted on

The Ultimate Guide to Hunting Cooler Brands: More Than Just Keeping Your Drinks Cold

Best Coolers for Hunting 2023 Yeti Orion RTIC Cabela's Orca

Are you a passionate hunter who loves spending long hours in the great outdoors? If so, you know that having the right equipment is essential for a successful hunting trip. And one piece of gear that often gets overlooked but is crucial for any hunting adventure is a high-quality cooler.

But wait, you might be thinking, isn’t a cooler just for keeping drinks cold? Well, my fellow hunters, it’s time to expand your horizons because a hunting cooler is so much more than that. It’s your reliable companion that ensures your freshly harvested meat stays fresh, prevents bacterial growth, and ultimately preserves the quality of your hard-earned game.

In this article, we will look into the world of hunting cooler brands, exploring their unique features, benefits, and drawbacks. So, grab a seat, sharpen your hunting instincts, and let’s embark on a journey to discover the best hunting cooler brands out there.

The Role of a Hunting Cooler

Beyond Keeping Drinks Cold

Hunters, listen up! A hunting cooler is not just your average beverage chiller. It serves a far greater purpose than simply keeping your drinks refreshingly cold. When you’re out in the field, a hunting cooler becomes your trusted ally in preserving the quality and safety of your hard-earned game.

Think about it: you’ve spent hours tracking, stalking, and finally harvesting your prized game. The last thing you want is for all your efforts to go to waste due to improper storage. That’s where a hunting cooler steps in to save the day.

Preventing Bacterial Growth and Spoilage

One of the most critical aspects of hunting is ensuring the freshness and safety of the meat you bring home. When an animal is harvested, its body temperature begins to rise, creating an ideal environment for bacteria to thrive. This rapid bacterial growth can lead to spoilage and potential health risks if not addressed promptly.

Here’s where a hunting cooler becomes your knight in shining armor. By quickly cooling the freshly harvested meat, you slow down bacterial growth, preserving the quality and taste of the meat. A high-quality hunting cooler with excellent insulation and ice retention capabilities can keep your game at safe temperatures for an extended period, giving you peace of mind and ensuring that your hard-earned harvest remains in pristine condition.

So, my fellow hunters, never underestimate the crucial role a hunting cooler plays in your hunting expeditions. It goes beyond keeping your drinks cold; it’s your guardian of freshness, your protector against spoilage, and your ticket to savoring the fruits of your hunting labor.

Detailed Reviews of Top Hunting Cooler Brands

Now, let’s dive into the exciting world of hunting cooler brands and explore the top contenders that have won the hearts of hunters worldwide. Each brand brings its unique strengths and features to the table, ensuring that you find the perfect cooler to suit your specific needs. So, without further ado, let’s explore the detailed reviews of the top hunting cooler brands:

Yeti Best Hunting Cooler

1. Yeti

Brief History and Mission: Yeti, a true pioneer in the cooler industry, was founded in 2006 by two brothers who shared a passion for the great outdoors. Their mission was simple yet ambitious: to create the toughest, most durable coolers on the market that could withstand any adventure.

Key Features: Yeti coolers are renowned for their ruggedness and ability to keep food and drinks cold for extended periods. Their Tundra Cooler series, in particular, is a popular choice for big game hunting, allowing hunters to stay out in the field for longer durations. Yeti coolers come in various sizes, catering to different storage needs. Additionally, they offer customization options, allowing hunters to add a personal touch to their gear.

Pros and Cons: Yeti coolers have gained a stellar reputation among hunters for their durability, ice retention capabilities, and customization options. However, it’s important to note that the higher price tag and weight of Yeti coolers may be a deterrent for some hunters. Availability in stores can also be a challenge.

Warranty and Customer Service: Yeti offers a generous 5-year warranty on their coolers, demonstrating their confidence in the quality of their products. Their customer service is known for being responsive and helpful, ensuring that hunters have a smooth experience.

Orca Best Hunting Cooler

2. Orca

Brief History and Mission: Orca, a rising star in the hunting cooler scene, has been making waves since its establishment. Founded by a group of outdoor enthusiasts, Orca aims to provide hunters with coolers that excel in ice retention, durability, and versatility.

Key Features: Orca coolers are highly regarded for their exceptional ice retention, with some models capable of keeping ice frozen for an impressive 6-9+ days. These coolers are designed to withstand wear and tear, making them ideal for rugged hunting expeditions. Orca offers a variety of sizes and colors, allowing hunters to choose the perfect cooler to match their style and needs.

Pros and Cons: Orca coolers have gained popularity among hunters for their outstanding ice retention, durability, and lifetime warranty. However, the higher price point and stiff handle on some models may be drawbacks for some users. Availability in stores can also be limited compared to other brands.

Warranty and Customer Service: Orca coolers come with a limited lifetime warranty, reflecting the brand’s commitment to quality and customer satisfaction. Their customer service is known for being responsive and helpful, ensuring that hunters have a positive experience.

RTIC Best Hunting Cooler

3. RTIC Outdoors

Brief History and Mission: RTIC Outdoors has made a name for itself by offering high-quality, roto-molded coolers at more affordable prices. The company’s mission is to provide hunters with durable and budget-friendly coolers that can withstand the demands of outdoor adventures.

Key Features: RTIC coolers are designed to be more durable than average coolers, making them an excellent choice for hunting trips. They come in a range of sizes and colors, allowing hunters to find the perfect fit for their needs. RTIC coolers are made in the USA and come with a limited warranty.

Pros and Cons: RTIC coolers have gained recognition for their durability, affordability, and variety of sizes and colors. However, some users have noted that the ice retention may not be as long as some other brands. Comfort of carry and ease of use can also be areas of improvement.

Warranty and Customer Service: RTIC coolers come with a limited warranty, providing peace of mind to hunters. Their customer service is known for being responsive and helpful, ensuring that any issues are resolved promptly.

Cabela's Best Hunting Cooler

4. Cabela’s

Brief History and Mission: Cabela’s, a well-established name in the outdoor industry, has been catering to the needs of hunters for decades. With a mission to provide high-quality gear at affordable prices, Cabela’s has become a trusted brand among hunters.

Key Features: Cabela’s offers a range of coolers for hunting, including the Polar Cap Equalizer hard cooler and a line of soft coolers. The Polar Cap Equalizer hard cooler is designed to keep ice frozen for up to 10 days and comes in various sizes. Cabela’s coolers are known for their durability and affordability.

Pros and Cons: Cabela’s coolers are praised for their durability, affordability, and variety of sizes. However, some users have noted that the ice retention may not be as long as some other high-end brands. Brand recognition and limited customization options can also be areas of improvement.

Warranty and Customer Service: Cabela’s coolers come with a warranty, ensuring that hunters have peace of mind. Their customer service is known for being responsive and helpful, ensuring a positive experience for hunters.

Orion Best Hunting Cooler

5. Orion

Brief History and Mission: Orion coolers, crafted by the same people who make Jackson Kayaks, have gained a reputation for their durability and performance. With a focus on versatility and durability, Orion aims to provide hunters with coolers that can withstand any adventure.

Key Features: Orion coolers come in a range of sizes, making them suitable for various hunting trips. Most Orion coolers feature camo color patterns, making them a popular choice for deer hunting and camping. They are designed to be durable and come with features like YakAttack gear tracks, bottle openers, and tie-down points.

Pros and Cons: Orion coolers are praised for their versatility, camo color patterns, and durability. However, some users have noted that they may be more expensive than some other high-end brands. The latches on some models can also be challenging to open and close.

Warranty and Customer Service: Orion coolers typically come with a warranty, ensuring that hunters are satisfied with their purchase. Their customer service is known for being responsive and helpful, addressing any concerns or issues promptly.

With these detailed reviews, you now have a better understanding of the top hunting cooler brands available in the market. Each brand brings its unique strengths and features, allowing you to choose the perfect cooler that aligns with your hunting needs and preferences.

Comparison of Top Hunting Cooler Brands

Now that we have explored the detailed reviews of the top hunting cooler brands, let’s compare them side by side to help you make an informed decision. Below, you’ll find a comparison table highlighting key features, pros, cons, and prices of each brand. Additionally, we’ll discuss which coolers might be best for specific hunting scenarios or needs.

BrandKey FeaturesProsConsPrice Range (Approx.)
YetiRuggedness, excellent insulation, customization optionsDurability, ice retention, customization, brand reputationHigher price, weight, availability in storesHigh
OrcaExceptional ice retention, durability, variety of sizesIce retention, durability, lifetime warrantyHigher price, limited availability, stiff handleHigh
RTICDurability, affordability, variety of sizes and colorsDurability, affordability, variety of sizes and colorsIce retention may not be as long as some other brandsMedium
Cabela’sDurability, affordability, range of sizes and stylesDurability, affordability, range of sizesIce retention may not be as long as some other high-end brandsMedium
OrionVersatility, camo color patterns, durability, featuresVersatility, camo color patterns, durabilityHigher price, latches can be challenging to open and closeHigh
Comparison of Best Hunting Coolers Pro’s and Con’s

When it comes to choosing the best hunting cooler for specific scenarios or needs, here are some recommendations:

  • Yeti: If you prioritize durability, ice retention, and customization options, Yeti coolers are an excellent choice. They are ideal for hunters who value brand reputation and are willing to invest in a high-quality cooler.
  • Orca: If exceptional ice retention and durability are your top priorities, Orca coolers won’t disappoint. They are perfect for hunters who need their game to stay cold for extended periods, and the lifetime warranty provides added peace of mind.
  • RTIC: For hunters seeking a balance between durability and affordability, RTIC coolers are a great option. They offer a variety of sizes and colors, making them suitable for different hunting trips and budgets.
  • Cabela’s: If you’re looking for a durable and affordable cooler with a range of sizes and styles, Cabela’s coolers are worth considering. They are a solid choice for hunters who prioritize affordability without compromising on quality.
  • Orion: If versatility, camo color patterns, and additional features are important to you, Orion coolers are a fantastic choice. They are ideal for hunters who value customization options and need a cooler that can withstand rugged outdoor adventures.

Ultimately, the best hunting cooler brand for you will depend on your specific needs, preferences, and budget. Consider the key features, pros, and cons of each brand, and choose the one that aligns with your hunting style and requirements.

Tips for Maximizing the Efficiency of Your Hunting Cooler

To ensure that your hunting cooler performs at its best and keeps your food and drinks cold for as long as possible, follow these practical tips and tricks:

Getting the Most Out of Your Cooler

  1. Pre-Chill Your Cooler: Before you pack your cooler, pre-chill it by adding ice or ice packs for a few hours. This helps to lower the internal temperature and create a cold environment for your perishables.
  2. Organize Your Cooler: Proper organization is key to maximizing efficiency. Place ice packs or frozen items at the bottom to create a cold base. Pack perishable items on top, ensuring they are well-sealed or wrapped to prevent any leakage or cross-contamination.
  3. Use Block Ice: Instead of relying solely on ice cubes, consider using block ice. Block ice melts slower and provides a more consistent cooling effect, keeping your contents colder for longer.
  4. Minimize Air Gaps: Fill any empty spaces in your cooler with additional ice packs, crumpled newspaper, or even frozen water bottles. Minimizing air gaps helps maintain a colder temperature and prevents warm air from entering the cooler.
  5. Limit Opening the Cooler: Every time you open the cooler, warm air enters and cold air escapes. To minimize this, plan ahead and only open the cooler when necessary. This helps to preserve the internal temperature and extend the life of the ice.

Proper Packing, Maintenance, and Ice Life Extension

  1. Pack in Layers: When packing your cooler, layer perishable items with ice packs or block ice. This ensures even distribution of cold and helps maintain a consistent temperature throughout the cooler.
  2. Keep it Closed: Avoid leaving your cooler open for extended periods. The more you open it, the quicker the cold air escapes, and the faster the ice melts. Limiting the opening and closing of the cooler helps to preserve the ice and maintain the desired temperature.
  3. Avoid Direct Sunlight: Keep your cooler in the shade or cover it with a reflective blanket to minimize exposure to direct sunlight. Sunlight can quickly heat up the cooler and accelerate ice melting.
  4. Drain Melted Water: As the ice melts, drain the water from your cooler regularly. Excess water can accelerate ice melting and reduce the overall cooling efficiency.
  5. Keep it Clean: After each use, clean your cooler thoroughly with mild soap and water. This prevents any residue or odors from lingering and ensures a fresh start for your next hunting trip.

By following these tips, you can maximize the efficiency of your hunting cooler, prolong the life of the ice, and keep your food and drinks cold for an extended period. Remember, a well-maintained cooler is your best companion in preserving the freshness and quality of your hunting spoils.

Now that you’re armed with these practical tips and tricks, go ahead and make the most of your hunting cooler on your next thrilling adventure!

Conclusion

In conclusion, we have explored the world of hunting cooler brands and discovered that they are more than just a means to keep your drinks cold. A hunting cooler plays a crucial role in preserving the freshness and quality of your hard-earned game by quickly cooling the meat and preventing bacterial growth and spoilage.

Throughout this article, we reviewed the detailed reviews of the top hunting cooler brands, including Yeti, Orca, RTIC Outdoors, Cabela’s, and Orion. Each brand brings its unique strengths and features to the table, catering to the diverse needs and preferences of hunters. Whether you prioritize durability, ice retention, affordability, or customization options, there is a hunting cooler brand that suits your requirements.

We also provided practical tips and tricks to help you maximize the efficiency of your hunting cooler. From proper packing techniques to maintenance and ice life extension strategies, these tips ensure that your cooler performs at its best, keeping your food and drinks cold for longer durations.

As you embark on your hunting adventures, we encourage you to consider your specific needs and preferences when choosing a hunting cooler. Think about factors such as insulation, durability, size, price, and the specific features that align with your hunting style. Take into account the pros and cons of each brand and make an informed decision that suits your requirements.

Remember, a high-quality hunting cooler is not just a luxury; it’s an essential tool that safeguards the freshness and safety of your game. So, choose wisely and invest in a hunting cooler that will be your reliable companion on all your hunting expeditions.

We hope this ultimate guide to hunting cooler brands has provided you with valuable insights and helped you navigate the vast array of options available. Now, it’s time to gear up, pack your cooler, and embark on unforgettable hunting adventures with the confidence that your game will stay fresh and your thirst will be quenched.

Happy hunting!

F.A.Q.

  1. Q: How long can a hunting cooler keep ice frozen? A: The ice retention capabilities of hunting coolers vary depending on the brand and model. High-quality coolers can typically keep ice frozen for several days, ranging from 3 to 10+ days. Factors such as insulation, cooler size, and external conditions can also affect ice retention.
  2. Q: Are hunting coolers worth the investment? A: Absolutely! Investing in a high-quality hunting cooler is worth it for several reasons. It ensures the freshness and safety of your game by preventing bacterial growth and spoilage. Additionally, a durable cooler can withstand rugged outdoor conditions and last for years, saving you money in the long run.
  3. Q: Can I use regular coolers for hunting trips? A: While regular coolers can be used for hunting trips, they may not offer the same level of insulation, durability, and ice retention as hunting-specific coolers. Regular coolers may struggle to keep perishables cold for an extended period, potentially compromising the quality of your game.
  4. Q: How do I clean and maintain my hunting cooler? A: To clean your hunting cooler, use mild soap and water to wipe down the interior and exterior. Rinse thoroughly and allow it to air dry before storing. Regularly inspect and clean the cooler’s sealing gasket to ensure a tight seal. Additionally, store your cooler in a cool, dry place when not in use to prevent mold or mildew growth.

Q: Can I use dry ice in my hunting cooler? A: Yes, you can use dry ice in your hunting cooler, but it requires extra caution. Dry ice can create extremely low temperatures, so handle it with gloves and avoid direct contact with skin. Place the dry ice on top of the perishables, ensuring proper ventilation within the cooler. Remember to follow safety guidelines provided by the dry ice manufacturer.

Posted on

Hunting License Costs in the United States: How Much Is A License In Every State?

Resident Hunting License For Every State in the U.S.

Hunting is a popular outdoor activity enjoyed by millions of Americans each year. Whether you are looking to get a license for the first time or thinking of traveling to a new state to hunt, one thing is certain: obtaining a hunting license is an essential step in ensuring a safe and legal hunting experience.

In this article, we will look into the costs associated with hunting licenses across all 50 states in the United States. We will explore the variations in costs for residents, non-residents, short-term licenses, and even lifetime licenses. Additionally, we will provide visual representations of the data through bar charts, allowing for a quick and easy comparison of hunting license costs.

Understanding the costs of hunting licenses is crucial for both seasoned hunters and newcomers to the sport. It not only helps you plan your hunting trips effectively but also ensures that you are in compliance with the legal requirements of each state. So, let’s dive in and explore all the different costs of hunting license’s in the United States.

Table of Hunting License Costs by State

To provide you with a comprehensive overview of hunting license costs in the United States, we have compiled a table showcasing the costs for residents, non-residents, short-term licenses, and even lifetime licenses in each state. Please note that the costs mentioned are subject to change, and it is always advisable to check with the respective state’s wildlife agency for the most up-to-date information.

StateResident CostNon-Resident CostShort-Term Non-Resident CostLifetime License Cost
Alabama$31$351 (Annual)$217 (10-Day), $153 (3-Day)$380-$640
Alaska$45$160 (Annual)N/AN/A
Arizona$37N/AN/A$290-$630
Arkansas$25-$35$350 (Annual)$180 (5-Day), $125 (3-Day), $55 (1-Day)$1,000
California$54$188 (Annual)$54 (2-Day), $25 (1-Day)$640-$1,050
Colorado$42-$340$110 (Annual)N/AN/A
Connecticut$19-$41$91-$135 (Annual)N/AN/A
Delaware$39$188 (3-Day)N/AN/A
Florida$17$152 (Annual)$46 (10-Day)$200-$500
Georgia$15$100 (Annual)$20 (1-Day)$315-$750
Hawaii$20$105 (Annual)N/AN/A
Idaho$16$185 (Annual)N/A$221-$386
Illinois$13$57 (Annual)$35 (5-Day)$360
Indiana$32-$39$90 (Annual)$50 (5-Day)N/A
Iowa$22$144 (Annual)$77 (5-Day)$61
Kansas$28$98 (Annual)N/A$502
Kentucky$30-$100$185-$550 (Annual)N/AN/A
Louisiana$20$200 (Annual)$20 (10-Day), $65 (5-Day)$500-$4,000
Maine$26$115 (Annual)N/A$10-$900
Maryland$25$130 (Annual)N/AN/A
Massachusetts$30$67-$101 (Annual)N/AN/A
Michigan$11$151 (Annual)N/AN/A
MinnesotaVariesVariesVariesVaries
Mississippi$14-$25$300 (Annual)$150 (7-Day), $150 (3-Day)$500-$1,500
Missouri$10-$50$10-$50N/A$70-$800
Montana$10$15N/AN/A
Nebraska$18$97 (Annual)N/AN/A
Nevada$15-$75$15-$155 (Annual)$23 (1-Day)N/A
New Hampshire$32$113 (Annual)N/A$9-$900
New Jersey$27-$31$135 (Annual)N/AN/A
New Mexico$15$65 (Annual)N/AN/A
New York$22$100 (Annual)N/A$65-$765
North Carolina$25$100 (Annual)N/A$265
North Dakota$10-$30$250-$600 (Annual)N/AN/A
Ohio$19$180 (Annual)N/A$85-$450
Oklahoma$20-$100$20-$500N/A$625
Oregon$34$172 (Annual)N/AN/A
Pennsylvania$20$101 (Annual)N/AN/A
Rhode Island$21$55 (Annual)N/AN/A
South Carolina$12N/AN/A$300
South DakotaVariesVariesVariesVaries
Tennessee$33$305 (Annual)N/A$320-$1900
Texas$25$315 (Annual)N/A$1,000
Utah$13-$45$29-$400N/AN/A
Vermont$28$102 (Annual)N/AN/A
Virginia$23$111 (Annual)N/A$25-$260
WashingtonVariesVariesVariesVaries
West VirginiaVariesVariesVaries$312-$703
Wisconsin$18-$24$85-$250N/A$312-$703
WyomingVariesVariesVariesVaries
Table of State by State Hunting License Costs

Please note that the costs mentioned above are subject to change, and it is always advisable to check with the respective state’s wildlife agency for the most up-to-date information.

Visual Representation of Hunting License Costs

To provide a visual comparison of hunting license costs across all 50 states, we have created two bar charts. The first chart showcases the costs of resident hunting licenses, while the second chart displays the costs of non-resident hunting licenses.

Resident Hunting License Cost

Resident Hunting License Cost in The United States

You can view the interactive version of the chart here.

The bar chart above illustrates the varying costs of resident hunting licenses in each state. As you can see, the costs range from as low as $10 in some states to as high as $340 in others. This visual representation allows you to quickly identify the states with the highest and lowest resident hunting license costs.

Non-Resident Hunting License Cost

Non-Resident Hunting License Cost in The United States

You can view the interactive version of the chart here.

The bar chart above provides a comparison of non-resident hunting license costs across all 50 states. The costs for non-residents can be significantly higher than those for residents, with some states charging as much as $600 for an annual non-resident hunting license. This visual representation helps you understand the variations in costs for non-residents across different states.

These bar charts offer a clear and concise overview of the hunting license costs for both residents and non-residents. However, it is important to note that these charts represent the general costs and may not include specific variations or additional fees that may apply in certain states. For more detailed information, we recommend referring to the table provided earlier or contacting the wildlife agency of the respective state.

Detailed Breakdown of Hunting License Costs

In this section, we will provide a state-by-state breakdown of hunting license costs, highlighting any variations or unique aspects of each state’s licensing structure. Please note that the costs mentioned are subject to change, and it is always advisable to check with the respective state’s wildlife agency for the most up-to-date information.

  1. Alabama: Residents can obtain a hunting license for $31, while non-residents have the option of an annual license for $351. Short-term non-resident licenses are also available for $217 (10-day) or $153 (3-day). Alabama offers lifetime licenses ranging from $380 to $640.
  2. Alaska: Residents can purchase an annual hunting license for $45, while non-residents pay $160. Alaska does not offer short-term licenses or lifetime licenses.
  3. Arizona: Residents of Arizona can obtain a hunting license for $37. Non-residents, however, are not eligible for hunting licenses in this state. Arizona offers lifetime licenses ranging from $290 to $630.
  4. Arkansas: Hunting license costs in Arkansas vary depending on residency status. Residents can purchase licenses ranging from $25 to $35, while non-residents pay $350 for an annual license. Short-term non-resident licenses are available for $180 (5-day), $125 (3-day), or $55 (1-day). Arkansas also offers a lifetime license for $1,000.
  5. California: Residents of California can obtain a hunting license for $54, while non-residents pay $188 for an annual license. Short-term non-resident licenses are available for $54 (2-day) or $25 (1-day). Lifetime licenses in California range from $640 to $1,050.
  6. Colorado: Hunting license costs in Colorado vary widely depending on the type of license and residency status. Resident license costs range from $42 to $340, while non-residents pay $110 for an annual license. Colorado does not offer short-term licenses or lifetime licenses.
  7. Connecticut: In Connecticut, hunting license costs range from $19 to $41 for residents. Non-residents can purchase an annual license for $91 to $135. Short-term licenses and lifetime licenses are not available in Connecticut.
  8. Delaware: Residents of Delaware can obtain a hunting license for $39, while non-residents have the option of a 3-day license for $188. Short-term non-resident licenses are available, but lifetime licenses are not offered in Delaware.
  9. Florida: Hunting licenses in Florida are affordable, with residents paying $17 for a license. Non-residents, on the other hand, pay $152 for an annual license or $46 for a 10-day license. Florida does not offer lifetime licenses.
  10. Georgia: Residents of Georgia can purchase a hunting license for $15, while non-residents pay $100 for an annual license. Short-term licenses are also available for $20 (1-day). Georgia offers lifetime licenses ranging from $315 to $750.
  11. Hawaii: In Hawaii, residents can obtain a hunting license for $20, while non-residents pay $105 for an annual license. Short-term licenses and lifetime licenses are not available in Hawaii.
  12. Idaho: Residents of Idaho can purchase a hunting license for $16, while non-residents pay $185 for an annual license. Idaho also offers lifetime licenses ranging from $221 to $386.
  13. Illinois: Hunting license costs in Illinois are relatively low, with residents paying $13 for a license and non-residents paying $57 for an annual license. Short-term licenses are available for $35 (5-day). Illinois offers a lifetime license for $360.
  14. Indiana: Hunting license costs in Indiana vary depending on residency status. Residents can obtain licenses ranging from $32 to $39, while non-residents pay $90 for an annual license. Short-term licenses are available for $50 (5-day). Indiana does not offer lifetime licenses.
  15. Iowa: Residents of Iowa can purchase a hunting license for $22, while non-residents pay $144 for an annual license. Short-term licenses are available for $77 (5-day). Iowa also offers a unique lifetime license for $61.
  16. Kansas: Hunting license costs in Kansas are affordable, with residents paying $28 for a license and non-residents paying $98 for an annual license. Short-term licenses are not available, but Kansas offers a lifetime license for $502.
  17. Kentucky: Hunting license costs in Kentucky vary depending on residency status. Residents can obtain licenses ranging from $30 to $100, while non-residents pay $185 to $550 for an annual license. Short-term licenses and lifetime licenses are not available in Kentucky.
  18. Louisiana: Residents of Louisiana can purchase a hunting license for $20, while non-residents pay $200 for an annual license. Short-term non-resident licenses are available for $20 (10-day) or $65 (5-day). Louisiana also offers lifetime licenses ranging from $500 to $4,000.
  19. Maine: In Maine, residents can obtain a hunting license for $26, while non-residents pay $115 for an annual license. Short-term licenses and lifetime licenses are available, with lifetime licenses ranging from $10 to $900.
  20. Maryland: Residents of Maryland can purchase a hunting license for $25, while non-residents pay $130 for an annual license. Short-term licenses and lifetime licenses are not available in Maryland.
  21. Massachusetts: Hunting license costs in Massachusetts are affordable, with residents paying $30 for a license. Non-residents, on the other hand, pay $67 to $101 for an annual license. Short-term licenses and lifetime licenses are not offered in Massachusetts.
  22. Michigan: Residents of Michigan can obtain a hunting license for $11, while non-residents pay $151 for an annual license. Short-term licenses and lifetime licenses are not available in Michigan.
  23. Minnesota: Hunting license costs in Minnesota vary and are subject to different regulations based on the type of game and residency status. It is advisable to check with the Minnesota Department of Natural Resources for specific hunting license costs.
  24. Mississippi: Residents of Mississippi can purchase hunting licenses ranging from $14 to $25. Non-residents pay $300 for an annual license or $150 for a 7-day or 3-day license. Mississippi also offers lifetime licenses ranging from $500 to $1,500.
  25. Missouri: Hunting license costs in Missouri vary depending on residency status. Residents can obtain licenses ranging from $10 to $50, while non-residents pay the same amount. Short-term licenses are not available, but Missouri offers lifetime licenses ranging from $70 to $800.
  26. Montana: In Montana, residents and non-residents pay the same fee of $10 for a hunting license. Short-term licenses and lifetime licenses are not available in Montana.
  27. Nebraska: Residents of Nebraska can purchase a hunting license for $18, while non-residents pay $97 for an annual license. Short-term licenses and lifetime licenses are not offered in Nebraska.
  28. Nevada: Hunting license costs in Nevada vary depending on residency status. Residents pay $15 to $75 for a license, while non-residents pay $15 to $155 for an annual license. Short-term licenses are available for $23 (1-day). Nevada does not offer lifetime licenses.
  29. New Hampshire: Residents of New Hampshire can obtain a hunting license for $32, while non-residents pay $113 for an annual license. Short-term licenses are not available, but New Hampshire offers lifetime licenses ranging from $9 to $900.
  30. New Jersey: Hunting license costs in New Jersey range from $27 to $31 for residents. Non-residents pay $135 for an annual license. Short-term licenses and lifetime licenses are not available in New Jersey.
  31. New Mexico: Residents of New Mexico can purchase a hunting license for $15, while non-residents pay $65 for an annual license. Short-term licenses and lifetime licenses are not offered in New Mexico.
  32. New York: In New York, residents can obtain a hunting license for $22, while non-residents pay $100 for an annual license. Short-term licenses are not available, but New York offers lifetime licenses ranging from $65 to $765.
  33. North Carolina: Residents of North Carolina can purchase a hunting license for $25, while non-residents pay $100 for an annual license. Short-term licenses and lifetime licenses are not available in North Carolina.
  34. North Dakota: Hunting license costs in North Dakota vary depending on residency status. Residents pay $10 to $30 for a license, while non-residents pay $250 to $600 for an annual license. Short-term licenses and lifetime licenses are not offered in North Dakota.
  35. Ohio: Residents of Ohio can obtain a hunting license for $19, while non-residents pay $180 for an annual license. Short-term licenses and lifetime licenses are available, with lifetime licenses ranging from $85 to $450.
  36. Oklahoma: Hunting license costs in Oklahoma vary depending on residency status. Residents pay $20 to $100 for a license, while non-residents pay $20 to $500. Short-term licenses and lifetime licenses are available, with lifetime licenses costing $625.
  37. Oregon: Residents of Oregon can purchase a hunting license for $34, while non-residents pay $172 for an annual license. Short-term licenses and lifetime licenses are not offered in Oregon.
  38. Pennsylvania: Residents of Pennsylvania can obtain a hunting license for $20, while non-residents pay $101 for an annual license. Short-term licenses and lifetime licenses are not available in Pennsylvania.
  39. Rhode Island: Residents of Rhode Island can purchase a hunting license for $21, while non-residents pay $55 for an annual license. Short-term licenses and lifetime licenses are not available in Rhode Island.
  40. South Carolina: Hunting license costs in South Carolina are affordable, with residents paying $12 for a license. Non-residents, however, are not eligible for hunting licenses in this state. South Carolina offers a lifetime license for $300.
  41. South Dakota: Hunting license costs in South Dakota vary and are subject to different regulations based on the type of game and residency status. It is advisable to check with the South Dakota Game, Fish, and Parks Department for specific hunting license costs.
  42. Tennessee: Residents of Tennessee can obtain a hunting license for $33, while non-residents pay $305 for an annual license. Short-term licenses are not available, but Tennessee offers lifetime licenses ranging from $320 to $1,900.
  43. Texas: Residents of Texas can purchase a hunting license for $25, while non-residents pay $315 for an annual license. Short-term licenses and lifetime licenses are available, with lifetime licenses costing $1,000.
  44. Utah: Hunting license costs in Utah vary depending on residency status. Residents pay $13 to $45 for a license, while non-residents pay $29 to $400. Short-term licenses and lifetime licenses are not offered in Utah.
  45. Vermont: Residents of Vermont can obtain a hunting license for $28, while non-residents pay $102 for an annual license. Short-term licenses and lifetime licenses are not available in Vermont.
  46. Virginia: Residents of Virginia can purchase a hunting license for $23, while non-residents pay $111 for an annual license. Short-term licenses and lifetime licenses are available, with lifetime licenses ranging from $25 to $260.
  47. Washington: Hunting license costs in Washington vary and are subject to different regulations based on the type of game and residency status. It is advisable to check with the Washington Department of Fish and Wildlife for specific hunting license costs.
  48. West Virginia: Hunting license costs in West Virginia vary and are subject to different regulations based on the type of game and residency status. Lifetime licenses in West Virginia range from $312 to $703.
  49. Wisconsin: Hunting license costs in Wisconsin vary depending on residency status. Residents pay $18 to $24 for a license, while non-residents pay $85 to $250. Short-term licenses and lifetime licenses are available, with lifetime licenses ranging from $312 to $703.
  50. Wyoming: Hunting license costs in Wyoming vary and are subject to different regulations based on the type of game and residency status. It is advisable to check with the Wyoming Game and Fish Department for specific hunting license costs.

It is important to note that hunting license costs may vary based on factors such as age, type of game, and additional permits or stamps required. Additionally, some states may offer discounted rates for military personnel or senior citizens. For more detailed information on hunting license costs and regulations in each state, we recommend contacting the respective state’s wildlife agency or visiting their official websites.

How to Purchase a Hunting License

If you’re ready to embark on your hunting adventure, the first step is to obtain a hunting license. The process of purchasing a hunting license may vary slightly from state to state, but here is a general guide on how to purchase a hunting license, with a focus on online purchasing options.

  1. Research the Requirements: Before purchasing a hunting license, familiarize yourself with the specific requirements of the state where you plan to hunt. Each state has its own regulations regarding residency, age restrictions, hunter education requirements, and specific hunting seasons. Visit the website of the state’s wildlife agency or department of natural resources to gather the necessary information.
  2. Choose an Authorized Vendor: Many states offer the convenience of purchasing hunting licenses online. Visit the official website of the state’s wildlife agency to find a list of authorized vendors. These vendors may include the state’s wildlife agency website itself, as well as other authorized online platforms.
  3. Select the License Type: Determine the type of hunting license you need based on your residency status, desired duration, and the type of game you plan to hunt. Most states offer options for resident licenses, non-resident licenses, short-term licenses, and sometimes even lifetime licenses. Ensure that you choose the correct license type that aligns with your hunting plans.
  4. Provide the Required Information: When purchasing a hunting license online, you will typically be asked to provide certain personal information, such as your full name, date of birth, address, and contact details. Additionally, you may need to provide proof of hunter education certification or other required documentation.
  5. Pay the License Fee: Once you have provided the necessary information, you will be prompted to pay the license fee. The fee amount will vary depending on the type of license you are purchasing and the state’s specific pricing structure. Online payment options usually include credit or debit cards.
  6. Receive and Print the License: After successfully completing the payment, you will receive a confirmation of your hunting license purchase. In most cases, you will have the option to print a physical copy of your license. It is important to carry this printed license with you while hunting, as it serves as proof of your legal authorization.
  7. Check for Additional Permits or Stamps: Depending on the state and the type of game you plan to hunt, you may need to obtain additional permits or stamps. These may include tags for specific species, archery permits, muzzleloader permits, or waterfowl stamps. Ensure that you are aware of any additional requirements and obtain the necessary permits or stamps before heading out into the field.

Remember, it is crucial to abide by all hunting regulations and license requirements to ensure a safe and legal hunting experience. If you have any doubts or questions regarding the hunting license purchasing process, reach out to the state’s wildlife agency or department of natural resources for guidance and clarification.

Now that you have armed yourself with the knowledge of how to purchase a hunting license, you are one step closer to enjoying the thrill of the hunt in a responsible and legal manner.

Conclusion

In this article, we have explored the hunting license costs in all 50 states of the United States. We began by providing a detailed table showcasing the costs of hunting licenses for residents, non-residents, short-term licenses, and lifetime licenses in each state. We then presented visual representations of the data through bar charts, allowing for a quick and easy comparison of hunting license costs.

Throughout this guide, we have highlighted the variations in hunting license costs across different states and residency statuses. From the affordable fees in some states to the higher costs in others, it is evident that hunting license costs can vary significantly. It is crucial for hunters to understand these costs as they plan their hunting trips and ensure compliance with the legal requirements of each state.

We have also emphasized the importance of researching and understanding the specific hunting license requirements and regulations of the state where you plan to hunt. Each state has its own set of rules and regulations, including residency requirements, age restrictions, hunter education requirements, and specific hunting seasons. It is essential to familiarize yourself with these regulations to ensure a safe and legal hunting experience.

Purchasing a hunting license has become increasingly convenient with the availability of online options in many states. We provided a brief guide on how to purchase a hunting license, focusing on the online purchasing process. However, it is important to note that the process may vary slightly from state to state. Always refer to the official website of the state’s wildlife agency or department of natural resources for the most accurate and up-to-date information on purchasing a hunting license.

In conclusion, understanding hunting license costs and regulations is crucial for both seasoned hunters and newcomers to the sport. It not only helps you plan your hunting trips effectively but also ensures that you are in compliance with the legal requirements of each state. By obtaining the necessary hunting license and adhering to the regulations, you can enjoy the thrill of the hunt while contributing to wildlife conservation efforts.

Remember, responsible hunting practices, including obtaining the appropriate licenses, respecting hunting seasons and bag limits, and practicing ethical hunting techniques, are essential for the preservation of our natural resources and the sustainability of wildlife populations. So, as you embark on your hunting adventures, always prioritize safety, respect for nature, and compliance with hunting license requirements.

Happy hunting!

Posted on

Taking Hunting to New Heights: The XOP Edge Platform Review

XOP Edge Review Setup on a tree for saddle hunting

My Saddle Hunting Journey and the XOP Edge

As a passionate hunter, I am always on the lookout for gear that can enhance my hunting experiences. One method that has truly revolutionized my approach is saddle hunting. The freedom and flexibility it offers are unparalleled, allowing me to choose any tree and adapt to changing conditions effortlessly.

In my quest to find the perfect saddle hunting platform, I stumbled upon the XOP Edge platform. Intrigued by its promises of stability, versatility, and value for money, I decided to give it a try. And let me tell you, it did not disappoint.

In this review, I will take you through my personal journey with the XOP Edge platform – from unboxing and examining its key specifications to discussing its unique features and performance in the field. By the end of this article, you’ll understand why the XOP Edge platform is an invaluable addition to any saddle hunter’s gear collection.

So grab your hunting gear and join me as we dive into the world of saddle hunting with the XOP Edge platform. Trust me, you won’t want to miss this exciting adventure.

Unboxing the XOP Edge: First Impressions

When my eagerly awaited package arrived, I couldn’t wait to tear it open and get my hands on the XOP Edge platform. The packaging was sturdy and well-designed, ensuring that the contents arrived in pristine condition.

Upon opening the box, I found the XOP Edge platform nestled securely within foam padding. Alongside it were a few additional items that caught my attention. These included an informational packet, an instruction manual, mounting instructions, stickers for some added flair, and a brochure showcasing other XOP products.

The first thing that struck me about the XOP Edge platform was its build quality. Made from 100% cast aluminum, it exuded durability and strength. The sleek design and attention to detail were immediately apparent, instilling confidence in its performance.

As I held the platform in my hands for the first time, I was impressed by its solid construction. It felt substantial without being overly heavy, striking a perfect balance between sturdiness and portability. This made it easy to carry on my pack without adding unnecessary weight to my hunting gear. For the first season using this I actually just attached backpack straps right to the platform and carried it that way.

Overall, the unboxing experience left me excited to put the XOP Edge platform to the test. Its impressive build quality and attention to detail hinted at a product that was designed with hunters’ needs in mind. Next up, let’s look into the key specifications of this remarkable saddle hunting platform.

The Nitty-Gritty: XOP Edge’s Key Specifications

To truly understand the capabilities of the XOP Edge platform, let’s take a closer look at its key specifications. This will give you a comprehensive understanding of what this platform brings to the table.

  • Dimensions: The XOP Edge platform measures approximately 13 and three quarters by 11 inches when open, providing ample space for comfortable hunting. When closed, it boasts a slim three-inch profile, making it easy to transport and store.
  • Weight: Weighing in at around four and a half pounds, the XOP Edge platform strikes a balance between strength and portability. It’s not the lightest in the market but its definitely way lighter than carrying a climber or hang on.
  • Material: Constructed from 100% cast aluminum, this platform is built to withstand the rigors of hunting season after season. Its robust construction ensures durability without sacrificing performance.
  • Weight Rating: The XOP Edge platform boasts an impressive weight rating of 350 pounds. This means it can accommodate hunters of various sizes and body types with ease, providing peace of mind while perched high above the forest floor.
  • Certifications: The XOP Edge platform meets ASTM F2128, F2126, F2125, and F2531 certifications. These industry standards ensure that the platform has undergone rigorous testing to guarantee its safety and reliability in the field.

With these specifications in mind, it’s clear that the XOP Edge platform is designed to meet the needs of serious saddle hunters. Its generous dimensions provide ample room for maneuvering while its sturdy build instills confidence in its ability to handle heavy loads.

In the next section, we’ll explore the design and construction of this remarkable saddle hunting platform. Get ready to be impressed by its attention to detail and innovative features!

Design and Functionality: The XOP Edge’s Winning Features

The design and construction of the XOP Edge platform play a crucial role in its overall performance and user experience. Let’s check out the details and see how this platform sets itself apart from the competition.

The first thing that caught my attention was the platform’s cast aluminum construction. This material choice not only ensures durability but also contributes to its overall stability. The platform feels rock-solid, with minimal flex even when subjected to side pressure. This instilled a sense of confidence in its ability to provide a stable base for hunting.

In terms of size, the XOP Edge platform strikes a balance between comfort and maneuverability. With dimensions of approximately 13 and three quarters by 11 inches, it offers enough space for hunters of various shoe sizes to find their footing comfortably. Even with larger shoe sizes, there is ample room to move, ensuring you can maintain your balance while taking aim at your target. This is the reason I use a platform and not a true one stick. I like being able to place my entire boot on the platform and stand if I want.

One standout feature of the XOP Edge platform is its ultra-grip traction surface. This innovative design element provides excellent grip, even in wet or slippery conditions. I found myself feeling secure and confident on the platform, knowing that I could focus on my hunt without worrying about slipping or losing my footing.

But what truly sets the XOP Edge platform apart are its unique features. The six-point offset bracket enhances tree grip, ensuring a firm attachment to the trunk for added stability. The center pivoting post allows for foot space and maneuvering around the tree, providing freedom of movement without compromising safety.


Additionally, the camming motion of the XOP Edge platform adds another layer of stability during use. This feature helps keep you steady while aiming or adjusting your position, allowing for precise shots without any wobbling or shaking. Be sure to watch my video if you ever need to re-cam a platform while up at hunting height.

Furthermore, I was impressed by the built-in strapping attachment points on the platform. These attachment points make securing backpack straps a breeze, keeping everything lightweight without needing to carry a backpack if you don’t want to. The tow rope hooks on the sides of the platform provide added convenience, allowing you to secure ropes or cords easily.

Lastly, the grooved cutouts on the XOP Edge platform are designed to accommodate up to four sticks, including XOP Minis, Lone Wolf Custom Gear minis, and most other climbing sticks. This versatility allows you to customize your setup according to your preferences and hunting needs.

XOP with an Api climbing stick neatly packed

In summary, the design and construction of the XOP Edge platform are top-notch. Its sturdy cast aluminum build, combined with innovative features like the six-point offset bracket and ultra-grip traction surface, make it a standout choice for saddle hunters seeking stability and comfort in their hunting adventures.

In the next section, I will share my personal experiences using the XOP Edge platform in various hunting scenarios. Stay tuned for an insightful evaluation of its performance in the field!

Performance in the Field: Putting the XOP Edge to the Test

Having put the XOP Edge platform to the test in various hunting scenarios, I can confidently say that its performance exceeded my expectations. Here, I will share my personal experiences and evaluate how this platform performs in real-life hunting situations.

One of the first things I noticed was the platform’s exceptional stability. Whether I was set up high in an awkward shaped tree or making slight adjustments to my position, the XOP Edge provided a rock-solid foundation. Its sturdy construction and ultra-grip traction surface instilled confidence, allowing me to focus on my hunt without any distractions.

The six-point offset bracket played a significant role in enhancing tree grip and overall stability. It securely anchored the platform to the tree, eliminating any wobbling or shifting during use. The last thing you want is a platform moving or un-camming on you. This feature proved particularly valuable when taking shots from various angles or dealing with uneven trees or side pressure.

I also appreciated the center pivoting post, which provided ample foot space and maneuverability around the tree. It allowed me to adjust my position effortlessly without compromising safety or comfort. Whether I needed to pivot for a better shot or reposition myself for improved visibility, the center pivoting post made it easy.

To sum it up, the XOP Edge platform delivers outstanding performance in the field. Its stability, tree grip, and overall functionality make it an invaluable tool for any saddle hunter. 

The XOP Edge: A Game-Changer for Saddle Hunting

When it comes to purchasing hunting gear, value for money is always a crucial factor to consider. In the case of the XOP Edge platform, it offers an excellent balance of features, performance, and affordability, making it a worthwhile investment for saddle hunters.

Priced at $150, the XOP Edge platform stands out as one of the most budget-friendly options in the saddle hunting market. I was even able to find it on sale for $40 off so keep and you out for coupons or sales. Considering its solid construction, innovative features, and impressive stability, this platform offers remarkable value for its price point.

Comparing the XOP Edge platform to other platforms in the market, such as the Tethrd Predator platform, highlights its competitive edge in terms of affordability. While there may be slight differences in design or specific features between platforms, the XOP Edge holds its ground admirably and often surpasses expectations.

The sturdy cast aluminum construction ensures durability and longevity, allowing you to enjoy countless hunting seasons with this platform. Its weight rating of 350 pounds accommodates hunters of various sizes and body types without compromising safety or stability.

Furthermore, the XOP Edge platform’s adjustable lean feature adds versatility and adaptability to different hunting situations. This allows you to find your preferred angle for maximum comfort all by adjusting a set screw giving you a customized fit for all day comfort.

Considering all these factors together, it’s evident that the XOP Edge platform provides exceptional value for money. It offers a reliable and feature-packed option at an affordable price point, making it accessible to a wide range of hunters.

In conclusion, if you’re looking for a saddle hunting platform that combines affordability with performance without compromising on quality or functionality, then the XOP Edge platform is an excellent choice. Its value for money proposition is hard to beat in today’s market.

In the final section of this review, I will recap the strengths of the XOP Edge platform while also highlighting areas where improvements could be made. Stay tuned for my final verdict on this remarkable saddle hunting platform!

Final Verdict: Why the XOP Edge is My Go-To Platform

After thoroughly evaluating the XOP Edge platform, I can confidently say that it is a must-have for any saddle hunter. This remarkable platform offers a combination of durability, stability, and affordability that is hard to find in the market.

With its sturdy cast aluminum construction and innovative features like the six-point offset bracket and ultra-grip traction surface, the XOP Edge platform delivers exceptional performance in the field. It provides a solid foundation for hunting, allowing you to focus on your target without worrying about stability or safety.

The XOP Edge platform’s versatility shines through its ability to accommodate modifications and personalization. Whether you’re looking to reduce weight, optimize gear storage, or customize attachments, this platform offers endless possibilities for tailoring it to your specific needs.

In terms of value for money, the XOP Edge platform truly stands out. Priced at $150, it offers an affordable option without compromising on quality or functionality. Its competitive edge in the market makes it an attractive choice for budget-conscious hunters who still demand top-notch performance.

While there may be minor observations regarding some chipping or potential areas for improvement, these do not detract from the overall excellence of the XOP Edge platform. With occasional touch-ups and careful consideration of modifications, you can easily address any minor concerns and maximize the platform’s potential.

In conclusion, I highly recommend the XOP Edge platform as an invaluable addition to any saddle hunter’s gear collection. Its exceptional stability, innovative features, and impressive value for money make it a standout choice in today’s market. Whether you’re a seasoned saddle hunter or just starting out on your journey, this platform will elevate your hunting experiences to new heights.

Don’t miss out on this opportunity to enhance your saddle hunting adventures with the XOP Edge platform. Trust me, once you experience its performance firsthand, you’ll wonder how you ever hunted without it.

FAQ

 Q: Is the XOP Edge platform suitable for hunters of all sizes? A: Yes, the XOP Edge platform has a weight rating of 350 pounds, making it suitable for hunters of various sizes and body types. It provides a stable and secure platform regardless of your weight.

Q: How does the XOP Edge platform compare to other platforms in terms of price? A: The XOP Edge platform is priced at $150, making it one of the most budget-friendly options in the saddle hunting market. It offers excellent value for money compared to other platforms with similar features.

Q: Does the XOP Edge platform come with a warranty? A: Yes, the XOP Edge platform comes with a manufacturer lifetime warranty on its metal components. This ensures that you’re covered in case of any manufacturing defects or issues.

Q: Can I use any climbing sticks with the XOP Edge platform? A: Yes, the XOP Edge platform features grooved cutouts that can accommodate up to four sticks, including XOP Minis, Lone Wolf Custom Gear minis, and many more. This provides flexibility in choosing your preferred climbing stick setup.

Q: Is there any assembly required for the XOP Edge platform? A: The XOP Edge platform comes pre-assembled and ready to use out of the box. Simply follow the included mounting instructions to attach it securely to your desired tree.

Q: Is the XOP Edge platform suitable for long hunting sessions? A: Yes, the XOP Edge platform provides a comfortable and stable base for extended hunting sessions. Its generous dimensions and ultra-grip traction surface ensure you can maintain your balance and focus on your hunt without discomfort.

Q: Can the XOP Edge platform be used in all weather conditions? A: Yes, the XOP Edge platform is designed to withstand different weather conditions. Its durable construction and ultra-grip traction surface provide excellent stability and grip, even in wet or slippery conditions.

Q: How easy is it to transport the XOP Edge platform? A: The XOP Edge platform’s compact design and lightweight construction make it easy to transport. Its slim three-inch profile when closed allows for convenient storage in your pack or gear bag.

Q: How secure is the attachment of the XOP Edge platform to the tree? A: The XOP Edge platform features a six-point offset bracket that provides excellent tree grip and stability. Combined with its aggressive teeth and slot lock technology, you can trust that this platform will remain securely attached to the tree throughout your hunting session.

Posted on

How to Launch Your Own Hunting Channel on YouTube

Self Filming Deer Hunt Starting a Youtube Channel

Isn’t it amazing how YouTube has become our go-to platform for sharing and experiencing all things outdoors? If you’re here, chances are you’ve felt the pull to start your own YouTube hunting channel. Maybe you’ve been inspired by a channel you follow, or perhaps you’ve got a unique perspective on hunting that you’re itching to share. Either way, you’re in the right place!

This blog post is your roadmap to launching a successful YouTube hunting channel. We’re not just talking about getting your channel off the ground – we’re talking about building a channel that resonates with your audience, stands out from the crowd, and grows into a thriving community of like-minded outdoor enthusiasts.

Understanding the YouTube Landscape

Before we dive into the nitty-gritty of starting a YouTube hunting channel, it’s crucial to understand the landscape of YouTube itself. YouTube is more than just a video-sharing platform; it’s a dynamic community where content creators and viewers interact, learn, and grow together.

Firstly, let’s talk about the YouTube algorithm. In simple terms, the algorithm is a set of rules that decides which videos get recommended to viewers. It’s influenced by factors like watch time, viewer engagement (likes, comments, shares), and the relevance of your videos to the viewer. Understanding this algorithm is key to increasing your channel’s visibility and attracting more viewers.

Now, let’s debunk a common misconception: YouTube success doesn’t happen overnight. It takes time, consistency, and a lot of hard work. You might not get thousands of subscribers or millions of views right away, and that’s okay. What matters is your passion for sharing your hunting experiences and your commitment to creating quality content.

Another important aspect to consider is monetization. Yes, it’s possible to make money on YouTube, but it’s not as easy as it seems. To qualify for YouTube’s Partner Program (which allows you to earn money from ads on your videos), you need at least 1,000 subscribers and 4,000 watch hours in the past 12 months. And even then, ad revenue can be unpredictable. That’s why many successful YouTubers diversify their income with sponsorships, merchandise, and other revenue streams.

Lastly, remember that YouTube is a community. Engaging with your viewers, responding to comments, and collaborating with other creators can help you build a loyal audience and grow your channel.

Understanding the YouTube landscape might seem daunting, but don’t let that discourage you. With the right knowledge and strategies, you can navigate this landscape and create a successful YouTube hunting channel. So, let’s get started!

Identifying Your Unique Selling Proposition

In the vast wilderness of YouTube, standing out can be as challenging as spotting a well-camouflaged deer in the brush. That’s where your Unique Selling Proposition (USP) comes into play.

Your USP is that special something that sets your channel apart from the rest. It’s the unique angle or niche that makes your hunting experiences different and interesting. Maybe it’s your expertise in a specific type of hunting, your unique approach to tracking game, or perhaps it’s your ability to explain complex hunting techniques in a way that’s easy for beginners to understand. Whatever it is, your USP is your ticket to capturing the attention of your target audience.

Identifying your USP requires some introspection. Start by asking yourself these questions:

  • What aspects of hunting are you most passionate about?
  • What hunting skills or knowledge do you have that others might find interesting or useful?
  • What unique perspectives or experiences can you bring to the table?
  • How do you want your audience to feel when they watch your videos?

Once you’ve identified your USP, the next step is to translate it into engaging content. This means showcasing your USP in your videos, whether it’s through the topics you choose, the way you present your content, or the unique insights you provide. Remember, your USP is what makes your channel uniquely you, so don’t be afraid to let your personality shine through.

In the end, your USP isn’t just about being different—it’s about adding value to your audience in a way that no one else can. And when you do that, you’ll not only attract viewers to your channel, but you’ll also turn them into loyal fans.

Creating Quality Content

Creating quality content is the cornerstone of any successful YouTube channel, and hunting channels are no exception. It’s not just about capturing your hunting experiences; it’s about presenting them in a way that’s engaging, informative, and visually appealing. Let’s break down what goes into creating quality content.

High-Quality Video Content

The first thing your viewers will notice about your videos is their quality. High-quality videos are more enjoyable to watch and can make your channel look more professional. Here’s what you need to consider:

Equipment: You don’t need a Hollywood budget to create high-quality videos. Start with what you have, even if it’s just your smartphone. As your channel grows, you might consider investing in a good-quality camera, a tripod for stable shots, a microphone for clear audio, and lighting equipment to ensure your videos are well-lit.

Filming Techniques: Mastering the art of filming is a journey, and like any journey, it starts with understanding the basics. Here are some fundamental filming techniques that can significantly enhance the quality of your videos:

Composition

Composition refers to how elements are arranged in your shot. It’s what makes a shot visually pleasing and engaging. Here are some basic principles of composition:

Rule of Thirds: Imagine your frame is divided into nine equal parts by two equally spaced horizontal lines and two equally spaced vertical lines. The rule of thirds suggests that you should place the most important elements in your scene along these lines, or at the points where they intersect. This technique can make your shots more balanced and interesting.

Leading Lines: Leading lines are lines that lead the viewer’s eye to the main subject of the shot. They can be anything from a trail in the woods to the line of sight of a person in your shot. Using leading lines can help guide the viewer’s attention and add depth to your shots.

Depth: Adding depth to your shots can make them more three-dimensional and engaging. You can create depth by including objects in the foreground, middle ground, and background of your shot.

Camera Angles

Using different camera angles can add variety and interest to your videos. Here are some common camera angles you might use:

Eye Level: This is the most natural camera angle, as it’s how we typically see the world. It’s great for capturing the hunter’s perspective.

Low Angle: A low angle shot is taken from below the subject, looking up. It can make the subject look powerful or imposing.

High Angle: A high angle shot is taken from above the subject, looking down. It can make the subject look vulnerable or small.

Point of View (POV): A POV shot shows the scene from the subject’s perspective. It’s a great way to immerse the viewer in the hunting experience.

Remember, variety is key. Using a mix of different camera angles can make your videos more dynamic and engaging.

Steady Footage

Steady footage is key, especially when you’re filming in the great outdoors. Shaky footage can be distracting and hard to watch. Here are some tips for capturing steady footage:

Use a Tripod or Monopod: A tripod or monopod can help stabilize your camera and capture steady shots. They’re especially useful for long shots or when you’re waiting for the perfect moment to capture a scene.

Use Image Stabilization: Many cameras and lenses come with built-in image stabilization, which can help reduce camera shake.

Practice Smooth Camera Movements: If you’re moving the camera, do it smoothly and slowly. Quick or jerky movements can make your footage look shaky.

Learning Resources

If you’re interested in learning more about filming techniques, there are plenty of resources available:

Online Courses: Websites like Coursera, Udemy, and MasterClass offer online courses on videography. These courses can teach you everything from the basics of filming to advanced techniques.

Books: There are many great books on videography, such as “How to Shoot Video That Doesn’t Suck” by Steve Stockman and “The Filmmaker’s Handbook” by Steven Ascher and Edward Pincus.

YouTube: YouTube itself is a great resource for learning about filming. Channels like Film Riot, DSLR Video Shooter, and D4Darious offer tutorials and tips on a wide range of filming techniques.

Remember, practice makes perfect. The more you film, the better you’ll get. So grab your camera and start shooting!

Editing: Editing is a crucial part of the video creation process. It’s where you take your raw footage and transform it into a story that captivates your audience. Here are some key aspects of video editing:

Cutting and Trimming

The first step in editing is usually to cut and trim your footage. This involves removing unnecessary parts of your clips and arranging the remaining parts in a way that tells your story effectively.

For example, if you have a long clip of you stalking a deer, you might want to cut it down to just the most exciting moments. Or if you have multiple clips of the same scene from different angles, you might want to cut between them to add variety and interest.

Transitions

Transitions are how you move from one clip to another. The simplest transition is a cut, where one clip immediately follows another. But there are many other types of transitions you can use, such as fades, wipes, and dissolves.

When used effectively, transitions can guide the viewer’s attention, indicate the passage of time, or create a certain mood or atmosphere. However, it’s important not to overuse transitions. Often, a simple cut is the best choice.

Color Correction and Grading

Color correction is the process of adjusting the colors in your footage to make them look more natural. This might involve adjusting the white balance, contrast, saturation, and other color settings.

Color grading, on the other hand, is more about creating a certain look or mood. For example, you might use color grading to give your footage a warm, golden look during a sunrise hunt, or a cool, blue look during a night hunt.

Sound Editing

Sound is a crucial part of any video. Good sound editing can enhance the viewer’s experience and make your video more immersive.

This might involve adding music or sound effects, adjusting the volume levels, or cleaning up background noise. Remember, the sound should support the visuals, not distract from them.

Learning Resources

If you’re new to video editing, there are plenty of resources available to help you learn:

Software Tutorials: Most editing software comes with tutorials or guides to help you get started. For example, Adobe Premiere Pro, one of the most popular editing software, has a range of tutorials available on the Adobe website.

Online Courses: Websites like Coursera, Udemy, and LinkedIn Learning offer online courses on video editing. These courses can teach you everything from the basics of editing to advanced techniques.

YouTube: YouTube is a great resource for learning about editing. Channels like Cinecom.net, Justin Odisho, and Peter McKinnon offer tutorials and tips on a wide range of editing techniques.

Books: There are many great books on video editing, such as “In the Blink of an Eye” by Walter Murch and “The Technique of Film and Video Editing” by Ken Dancyger.

Remember, editing is a skill that takes time and practice to master. Don’t be discouraged if your first few videos aren’t perfect. Keep learning, keep experimenting, and most importantly, keep having fun with it!

Balancing Entertainment and Education

One of the challenges of creating content for a YouTube hunting channel is striking the right balance between entertainment and education. Your viewers come to your channel to learn about hunting, but they also want to be entertained.

Try to make your educational content as engaging as possible. Use storytelling techniques, add humor where appropriate, and keep your explanations clear and concise. Show your viewers the action, not just the end result. Let them share in your triumphs and failures, your surprises and disappointments.

On the other hand, don’t forget to provide value in your entertaining content. Even when you’re sharing a thrilling hunting adventure, look for opportunities to educate your viewers. Share tips and insights, explain your decisions, and show your viewers what they can learn from your experiences.

The Power of Storytelling

Storytelling is a powerful tool in your content creation arsenal. A good story can captivate your viewers, draw them into your world, and make your videos more memorable.

Every hunt has a story. There’s the anticipation as you prepare for the hunt, the thrill of the chase, the challenges you overcome, and the satisfaction (or disappointment) of the outcome. Share these stories with your viewers. Let them experience the hunt with you, not just watch it.

Remember, stories are about more than just what happened. They’re about how you felt, what you learned, and how you grew. Don’t be afraid to show your viewers the real you—the excitement, the frustration, the joy, and the disappointment. It’s this authenticity that will make your stories resonate with your viewers and keep them coming back for more.

Creating quality content takes time, effort, and a lot of practice. But with each video you create, you’ll learn and improve. And remember, the most important thing is to enjoy the process. After all, you’re sharing your passion for hunting with the world. And there’s nothing more rewarding than that.

Building Your Brand

Creating a successful YouTube hunting channel isn’t just about producing great videos—it’s also about building a strong, recognizable brand. Your brand is what sets you apart from other channels, makes you memorable to your viewers, and creates a consistent experience across all your videos and social media platforms. Here’s how to build your brand:

Define Your Brand

Before you can build your brand, you need to define it. What is your channel all about? What makes it unique? What values and personality do you want to convey?

Think about your Unique Selling Proposition (USP) and how it translates into a brand. For example, if your USP is your humorous take on hunting, your brand might be fun, lighthearted, and a bit irreverent.

Create a Compelling Channel Name

Your channel name is often the first thing people see, so make it count. It should be memorable, easy to spell and pronounce, and give some indication of what your channel is about.

For example, if you specialize in bow hunting, you might include “bow hunting” in your channel name. Or if you’re known for your hunting adventures in a specific region, you might include the name of that region.

Design a Memorable Logo

Your logo is a visual representation of your brand. It should be simple, memorable, and work well at small sizes (since it will often be viewed as a small icon on YouTube).

Consider hiring a professional designer to create your logo, or use an online logo maker like Canva or Adobe Spark. Remember to keep your logo consistent across all your social media platforms.

Write a Compelling Channel Description

Your channel description is where you tell viewers what your channel is about and why they should subscribe. It should be concise, engaging, and include relevant keywords to help viewers find your channel.

Talk about the kind of content you create, who it’s for, and what makes it unique. And don’t forget to include a call to action, like “Subscribe for new hunting videos every week!”

Be Consistent

Consistency is key in branding. Your videos, thumbnails, logo, channel description, social media posts—all should reflect your brand.

This doesn’t mean everything has to look the same. Rather, they should feel like they’re part of the same family. For example, you might use the same color scheme or font across all your thumbnails, or start each video with the same intro.

Engage with Your Audience

Your brand isn’t just about how you present yourself—it’s also about how you interact with your viewers. Engage with your audience in a way that reflects your brand.

For example, if your brand is friendly and approachable, make sure to respond to comments, ask for feedback, and show appreciation for your viewers. If your brand is more professional, you might focus on providing expert advice and insights.

Building a brand takes time and effort, but it’s worth it. A strong brand can help you attract and retain viewers, stand out from the competition, and create a community around your channel. So start building your brand today, and watch your YouTube hunting channel grow!

Growing Your Audience

Growing your audience is one of the most challenging—and rewarding—aspects of running a YouTube hunting channel. It’s about more than just getting views. It’s about building a community of loyal viewers who look forward to your videos, engage with your content, and help spread the word about your channel. Here’s how to grow your audience:

Consistency is Key

One of the most effective ways to grow your audience is to post consistently. When you stick to a regular posting schedule, your viewers know when to expect new content and are more likely to keep coming back.

But consistency isn’t just about frequency—it’s also about quality. Strive to maintain a consistent level of quality in all your videos. This doesn’t mean every video has to be perfect, but your viewers should know they can always count on you for engaging, high-quality content.

Engage with Your Audience

Engaging with your audience is crucial for building a loyal community of viewers. Respond to comments on your videos, ask for feedback, and show appreciation for your viewers. This not only makes your viewers feel valued, but it also encourages them to engage more with your content.

You can also engage with your audience by incorporating their ideas and feedback into your videos. For example, you might do a Q&A video where you answer viewer questions, or a challenge video where you try a hunting technique suggested by a viewer.

Promote Your Channel

Promoting your channel can help you reach a wider audience. Share your videos on your social media platforms, collaborate with other YouTubers, or consider paid advertising if your budget allows.

Remember, promotion isn’t just about getting more views—it’s about getting more of the right views. Target your promotional efforts towards people who are likely to be interested in your content and become loyal viewers.

Master SEO

Search Engine Optimization (SEO) is a powerful tool for growing your audience. By using keywords effectively in your video titles, descriptions, and tags, you can help your videos appear in relevant search results and attract more viewers.

Start by researching keywords that are relevant to your content and popular among your target audience. Tools like Google Trends, Keyword Planner, and TubeBuddy can help with this.

Once you’ve identified your keywords, incorporate them into your video titles, descriptions, and tags. But remember, while keywords can help your videos get found, it’s engaging, high-quality content that will keep viewers watching.

Experiment and Adapt

Finally, don’t be afraid to experiment with different strategies and adapt based on what works. What works for one channel might not work for another, and what works today might not work tomorrow. Keep an eye on your analytics, listen to your audience, and be willing to change your approach if necessary.

Growing your audience takes time, effort, and a lot of patience. But with each new subscriber, like, and comment, you’ll know you’re on the right track. So keep creating, keep engaging, and keep growing. Your audience is out there, waiting to discover your channel.

Thinking Outside the Box

In the world of YouTube, standing out from the crowd can be a challenge. With so many hunting channels vying for viewers’ attention, thinking outside the box can be the key to capturing and holding that attention. Here are some innovative strategies to consider:

Collaborate with Other Channels

Collaborations can be a great way to reach a wider audience. Consider partnering with other YouTube channels—hunting-related or otherwise—for a joint video or series. This can introduce your channel to a whole new group of potential viewers who already enjoy similar content.

Leverage Trends

Stay up-to-date with the latest trends in the hunting community and on YouTube in general. This could be anything from a popular challenge or a new hunting technique, to a viral video format or meme. Incorporating trends into your videos can make them more relevant and appealing to viewers.

Create a Series

Consider creating a series or recurring segment on your channel. This could be anything from a weekly hunting tip to a multi-part guide to hunting a specific type of game. A series can give viewers something to look forward to and provide a sense of continuity across your videos.

Host Live Streams

Live streams can be a great way to connect with your audience in real-time. You could host a Q&A session, share a live hunting experience, or simply chat with your viewers. Live streams can create a sense of community and make viewers feel more connected to you.

Diversify Your Content

While your channel may be focused on hunting, don’t be afraid to diversify your content. You could share videos about related topics, like camping gear reviews, cooking recipes for game, or conservation issues. Diversifying your content can make your channel more interesting and attract a wider range of viewers.

Use Analytics

YouTube provides a wealth of analytics about your videos and viewers. Use this data to understand what’s working and what’s not. Which videos get the most views? When do people stop watching? What demographics are you reaching? Use this information to refine your content and targeting strategies.

Starting a YouTube hunting channel is a journey, and like any journey, it’s full of learning opportunities. So stay curious, stay creative, and most importantly, stay true to your passion for hunting. With dedication and a little outside-the-box thinking, you can create a channel that’s not only successful, but also a true reflection of you.

Monetizing Your Channel

Turning your passion for hunting and video creation into a source of income can be a rewarding aspect of running a YouTube channel. Here’s how you can monetize your channel:

YouTube Partner Program

The YouTube Partner Program allows creators to earn money from ads on their videos, channel memberships, and YouTube Premium revenue. To be eligible for the program, you need to:

  • Live in a country or region where the YouTube Partner Program is available.
  • Have more than 4,000 valid public watch hours in the last 12 months.
  • Have more than 1,000 subscribers.
  • Have a linked AdSense account.

Once you’re part of the program, you can earn money from ads on your videos. You can control the types of ads that appear on your videos, and you’ll receive a share of the revenue generated by these ads.

Sponsorships

Sponsorships can be a significant source of income for YouTube creators. Companies may pay you to feature their product in your video, mention them, or place their logo in your video.

When seeking sponsorships, focus on companies that are relevant to your content and audience. For example, hunting gear companies, outdoor brands, or local businesses related to hunting or the outdoors.

Remember, transparency is crucial with sponsorships. Make sure to disclose any sponsored content to your viewers and comply with YouTube’s guidelines on paid promotions.

Merchandise

Selling merchandise is another way to monetize your YouTube channel. This could be anything from t-shirts and hats with your channel logo, to hunting gear you recommend, to digital products like eBooks or guides.

You can sell merchandise directly through your YouTube channel with YouTube’s merchandise shelf feature, or through a third-party platform.

Affiliate Marketing

Affiliate marketing involves promoting a product and earning a commission for any sales made through your referral link. Many online retailers, including hunting and outdoor gear stores, have affiliate programs you can join.

Include your affiliate links in your video descriptions and let your viewers know that they can support your channel by shopping through these links.

Channel Memberships and Patreon

Channel memberships allow your viewers to pay a monthly fee for access to exclusive content, badges, new emojis, and other perks. This can be a great way to generate a steady income from your most loyal viewers.

Alternatively, you can set up a Patreon account where your fans can support you with a monthly donation in exchange for exclusive content and perks.

Remember, monetizing your channel should never come at the expense of creating content that you’re passionate about and that your viewers love. The most successful YouTube channels are those that have found a way to balance monetization with authentic, engaging content.

Navigating Challenges

Starting a YouTube hunting channel can be an exciting adventure, but like any journey, it comes with its share of challenges. Here are some potential hurdles you might face and tips on how to navigate them:

Dealing with Negative Comments

As your channel grows, you’re definitely going to encounter negative comments or criticism. While it can be disheartening, it’s important to remember that this is a part of putting yourself out there on the internet. Here’s how to handle it:

  • Stay Positive: Respond to negativity with positivity. Thank the person for their feedback and move on. Remember, you’re not going to please everyone, and that’s okay.
  • Learn from Constructive Criticism: Not all negative comments are bad. Some can provide valuable feedback that can help you improve your videos. Learn to differentiate between constructive criticism and plain negativity.
  • Ignore Trolls: Some people post negative comments just to provoke a reaction. Don’t feed the trolls—ignore them and focus on the positive comments instead.

Maintaining a Consistent Posting Schedule

Consistency is key to growing your audience, but maintaining a regular posting schedule can be challenging, especially when you’re balancing other commitments. Here’s how to manage it:

  • Plan Ahead: Plan your videos in advance and try to have a few videos ready to go in case something comes up and you can’t film.
  • Set Realistic Goals: Don’t overcommit yourself. It’s better to have a consistent schedule of one video per week than to burn out trying to post every day.
  • Batch Your Work: Try to film multiple videos at once, or do all your editing in one sitting. Batching your work can make the process more efficient.

Managing Public Perception

Hunting can be a controversial topic, and it’s important to be mindful of how your videos might impact public perception and local hunting areas. Here’s how to handle it:

  • Promote Ethical Hunting: Use your platform to promote ethical hunting practices. Show respect for the animals you hunt and the environment you hunt in.
  • Educate Your Viewers: Use your videos to educate your viewers about hunting. Explain why hunting is necessary for wildlife management and how it contributes to conservation.
  • Be Mindful of Local Impact: Be mindful of the potential impact of your videos on local hunting areas. Avoid revealing specific locations to prevent overhunting.

Starting a YouTube hunting channel can be challenging, but don’t let these hurdles deter you. With passion, perseverance, and a little bit of planning, you can navigate these challenges and create a successful channel that you’re proud of.

Conclusion

Embarking on the journey of starting a YouTube hunting channel is an adventure filled with creativity, community, and the shared passion for the great outdoors. From defining your unique selling proposition, creating quality content, building a recognizable brand, growing your audience, to navigating the challenges, each step is a testament to your dedication and love for hunting.

But remember, the journey doesn’t end with hitting the ‘Upload’ button. It’s a continuous process of learning, adapting, and growing. It’s about engaging with your audience, sharing your experiences, and contributing positively to the hunting community. It’s about turning your passion into a platform that educates, entertains, and inspires.

So, to all the aspiring hunting YouTubers out there, it’s time to take that first step. Your unique hunting experiences, your stories, your voice, have a place in the YouTube community. Equip yourself with the right gear, arm yourself with knowledge, and most importantly, fuel your journey with passion.

The woods are waiting, your audience is waiting. So, go ahead, start your YouTube hunting channel, and let the world join you in your hunting adventures. Because every hunt has a story, and the world is eager to hear yours.

Frequently Asked Questions

Q1: What equipment do I need to start a YouTube hunting channel?

A: Starting a YouTube hunting channel requires a basic set of filming equipment, including a good quality camera, a tripod or camera arm, a microphone for clear audio, and editing software for post-production. As you progress, you might also consider investing in additional equipment like a drone for aerial shots, action cameras for different perspectives, and lighting equipment for low-light conditions.

Q2: How often should I post videos on my channel?

A: Consistency is key when it comes to growing your audience. It’s less about the quantity and more about the regularity. Whether you choose to post daily, weekly, or bi-weekly, stick to a schedule that is manageable for you and aligns with the expectations of your audience.

Q3: How can I grow my audience?

A: Growing your audience involves a combination of producing high-quality, engaging content, optimizing your videos for search (SEO), promoting your channel on other platforms, and engaging with your audience through comments and social media.

Q4: How can I make money from my YouTube hunting channel?

A: There are several ways to monetize your YouTube channel. These include ad revenue from the YouTube Partner Program, sponsorships and brand partnerships, affiliate marketing, selling merchandise, and offering channel memberships or Patreon subscriptions.

Q5: How can I handle negative comments or criticism?

A: Negative comments or criticism can be tough, but it’s part of putting yourself out there on the internet. Stay positive, learn from constructive criticism, and ignore trolls or negativity that doesn’t serve you.

Q6: How can I promote ethical hunting practices on my channel?

A: Use your platform to educate viewers about ethical hunting practices. Show respect for the animals and the environment, explain the role of hunting in conservation and wildlife management, and always adhere to local hunting regulations in your videos.

Q7: What if I don’t have any experience with video editing?

A: Video editing is a skill that can be learned over time. There are numerous online resources, tutorials, and courses that can help you get started. Start with basic editing techniques and gradually progress to more advanced methods as you gain more experience and confidence.

Posted on

The Ultimate Angler’s Paradise: Unraveling the Magic of Fishing Piers in the Outer Banks

Fishing Piers in Obx

Today, we’re setting our compass towards the Outer Banks, a place that’s more than just a picturesque coastline. It’s a fisherman’s dream, a paradise where the Atlantic Ocean cradles a treasure trove of marine life, and the piers stand as gateways to an angler’s ultimate adventure.

Imagine this: As daybreak unfolds, the sky is brushed with strokes of vibrant orange and delicate pink. You’re standing on a sturdy pier that stretches out into the vast, sparkling Atlantic Ocean overlooking miles of the most beautiful beaches. The cool morning breeze carries the salty tang of the sea, and in your hands, you feel the familiar weight of your trusted fishing rod. As you cast your line into the depths, you can’t help but feel a rush of anticipation. The drum bite is red hot right now! This is fishing in the Outer Banks, an experience that’s as thrilling as it is serene.

But what makes fishing from a pier in the Outer Banks so special? Why do anglers from all corners of the globe flock here? Join us as we dive into the magic of these fishing piers, each with its unique allure and bountiful offerings. Whether you’re a seasoned angler who wants to take a break from driving on the beach in your 4×4 or a curious beginner, we promise this journey will leave you hooked. So, let’s reel in the adventure together!

Outer Banks Fishing Pier: A Historic Haven for Anglers

Let’s start our journey with the Outer Banks Fishing Pier. This historic pier, stretching out into the Atlantic, has been a favorite among anglers since its establishment in 1959. It’s more than just a structure; it’s a testament to the rich fishing culture of the Outer Banks.

The Outer Banks Fishing Pier offers a unique blend of convenience and charm. With its well-maintained structure and easy access, it’s a haven for both novice and experienced anglers. The pier is open 24 hours during the fishing season, allowing you to fish under the starlit sky or the warm glow of the rising sun.

But what truly sets this pier apart is the variety of fish that call these waters home. From the elusive Cobia to the mighty King Mackerel, the Outer Banks Fishing Pier offers a thrilling challenge for every angler. And let’s not forget the joy of reeling in a hefty Red Drum, a prized catch in these parts!

The pier also offers a range of amenities to enhance your fishing experience. Need to stock up on bait or rent some gear? The pier’s tackle shop has got you covered. And after a rewarding day of fishing, you can unwind at the on-site restaurant, Fish Heads Bar and Grill, where you can savor fresh seafood while enjoying panoramic ocean views.

Jennette’s Pier: Where Fishing Meets Conservation

Next on our journey is Jennette’s Pier, a state-of-the-art, 1,000-foot concrete marvel that’s not just a fishing pier, but a testament to the Outer Banks’ commitment to conservation and education.

Jennette’s Pier is a part of the North Carolina Aquarium Society, and it beautifully marries the thrill of fishing with the importance of marine conservation. As you cast your line into the deep blue waters, you’re not just fishing; you’re becoming a part of a larger mission to protect and understand our oceans.

The pier is home to a variety of fish species, making it a paradise for anglers. Whether it’s the thrill of battling a Bluefish or the joy of catching a Spanish Mackerel, fishing at Jennette’s Pier is an adventure that’s as diverse as the marine life beneath the waves.

But the allure of Jennette’s Pier extends beyond fishing. The pier houses interactive educational exhibits, aquariums, and even renewable energy demonstrations, offering a unique blend of fun and learning. It’s a place where you can reel in a big catch in the morning, learn about wind energy in the afternoon, and end the day watching a stunning Outer Banks sunset.

The pier also boasts a well-stocked tackle shop for all your fishing needs, and the pier staff are always ready to share tips and insights to help you make the most of your fishing experience.

Nags Head Fishing Pier: A Blend of Tradition and Fun

As we continue our journey, we arrive at Nags Head Fishing Pier, one of the oldest fishing piers in the Outer Banks. Established in 1947, this pier has been a beloved fishing spot for generations of anglers.

Nags Head Fishing Pier extends 750 feet into the Atlantic, offering ample space for you to cast your line into the Atlantic Ocean. The pier is home to a variety of fish species, including Flounder, Speckled Trout, and the much sought-after Sheepshead. Whether you’re a seasoned angler or a beginner, the thrill of reeling in a catch at Nags Head Fishing Pier is an experience to cherish and one you’ll always remember forever.

But the charm of Nags Head Fishing Pier extends beyond fishing. The pier is also home to a delightful restaurant and tiki bar. After a day of fishing, you can unwind with a refreshing drink, savor delicious seafood, and enjoy the stunning ocean views. The restaurant is famous for its breakfast, so make sure to start your fishing day with a hearty meal!

Moreover, the pier hosts various events throughout the year, adding a dash of fun to your fishing adventure. From fishing tournaments to live music, there’s always something exciting happening at Nags Head Fishing Pier.

Avalon Fishing Pier: A Hub for Anglers and Spectators Alike

Our journey now takes us to Avalon Fishing Pier, a popular spot in Kill Devil Hills that’s been attracting anglers and spectators since 1958. Stretching 696 feet into the Atlantic, this pier offers a unique fishing experience that’s steeped in the rich heritage of the Outer Banks.

Avalon Fishing Pier is known for its variety of fish species. From Spot and Croaker to the larger Cobia and King Mackerel, the pier offers a thrilling challenge for every angler. The excitement of casting your line into these waters and the anticipation of what you might reel in is an experience that keeps anglers coming back.

But Avalon Fishing Pier isn’t just for anglers. It’s also a great spot for those who simply want to enjoy the stunning ocean views or watch the anglers in action. The pier’s wooden planks have seen countless sunrise watchers, bird watchers, and families enjoying a leisurely stroll.

The pier also features a bait and tackle shop, where you can find all your fishing essentials. Whether you need to rent a rod, buy some bait, or pick up a souvenir, the friendly staff at the shop are always ready to assist.

Rodanthe Fishing Pier: A Serene Escape for Anglers

Our journey through the Outer Banks’ fishing piers now brings us to the charming village of Rodanthe. Here, the Rodanthe Fishing Pier stands as a beacon for anglers seeking a serene and rewarding fishing experience.

The Rodanthe Fishing Pier extends into the Atlantic, offering a tranquil spot for fishing. The pier is known for its variety of fish species, including Sea Mullet, Bluefish, and the occasional Cobia. Whether you’re casting your line in the early morning calm or under the starlit sky, fishing at Rodanthe Fishing Pier is a peaceful retreat from the hustle and bustle.

But the allure of Rodanthe Fishing Pier isn’t limited to fishing. The pier also offers stunning views of the Atlantic Ocean, making it a great spot for sunrise and sunset viewing. The sight of the sun rising or setting over the vast ocean, with the rhythmic sound of the waves in the background, is a truly mesmerizing experience.

The pier also features a well-stocked tackle shop, ensuring that you have all the essentials for a great fishing trip. And if you’re new to fishing, the friendly staff are always ready to share tips and help you get started.

Avon Fishing Pier: A Family-Friendly Fishing Adventure

Next on our journey is Avon Fishing Pier, located in the heart of Hatteras Island. This pier, extending 600 feet into the Atlantic, is a favorite among families and seasoned anglers alike.

Avon Fishing Pier offers a unique fishing experience with a variety of fish species. From the feisty Bluefish to the elusive King Mackerel, the pier promises a thrilling challenge for every angler. And with the pier’s open-air layout, you can enjoy the cool sea breeze and the stunning ocean views as you wait for the fish to bite.

But what truly sets Avon Fishing Pier apart is its family-friendly atmosphere. The pier is home to an arcade, where kids and adults can enjoy a variety of games. The pier also hosts fishing tournaments throughout the year, adding a dash of friendly competition to your fishing adventure.

The pier features a tackle shop, where you can find all your fishing essentials. Whether you need to rent a rod, buy some bait, or pick up a souvenir, the friendly staff at the shop are always ready to assist.

Conclusion: The End of Our Journey, The Start of Yours

As we reel in our lines and pack up our gear, we find ourselves at the end of our journey through the fishing piers of the Outer Banks. We’ve walked along the wooden planks of history at Nags Head Fishing Pier, marveled at the conservation efforts at Jennette’s Pier, and soaked in the serene atmosphere of Rodanthe Fishing Pier. We’ve experienced the family-friendly charm of Avon Fishing Pier and the bustling energy of Avalon Fishing Pier.

Each pier, with its unique allure and bountiful offerings, has painted a vivid picture of what fishing in the Outer Banks truly means. It’s not just about the thrill of the catch or the anticipation as you cast your line into the deep blue waters. It’s about the stories that unfold on these piers, the memories created, and the sense of community that binds every angler.

Fishing in the Outer Banks is an adventure that’s as diverse as the marine life beneath the waves. It’s a journey that takes you beyond the shore, into a world where the rhythm of the waves and the call of the sea create a symphony that’s as captivating as it is serene.

So, as we conclude our journey, we invite you to begin yours. Choose your pier, pack your gear, and set out on an adventure that promises to be as thrilling as it is rewarding. Whether you’re a seasoned angler or a curious beginner, the fishing piers of the Outer Banks are waiting to welcome you.

And remember, every cast is a story waiting to unfold. So, here’s to the stories you’ll tell, the memories you’ll create, and the adventure that awaits you in the Outer Banks. Tight lines, fellow anglers!

Cast Your Line with Us!

We hope our journey through the fishing piers of the Outer Banks has inspired you to embark on your own fishing adventure. Whether you’re a seasoned angler or a beginner, we’d love to hear about your experiences. Share your favorite fishing spots, your biggest catches, or your most memorable fishing stories with us. And if you have any questions or need some tips for your next fishing trip, don’t hesitate to ask. We’re here to help you reel in the big one!

FAQ

Q: What’s the best time to fish in the Outer Banks? A: While fishing in the Outer Banks is great year-round, the best time depends on the type of fish you’re after. Spring and fall are generally considered the best times for a variety of species.

Q: Do I need a fishing license to fish from a pier in the Outer Banks? A: No, you don’t need a fishing license to fish from a paid fishing pier in the Outer Banks. The piers have their own blanket licenses that cover all anglers.

Q: What should I bring for a fishing trip to the Outer Banks? A: Besides your fishing gear, it’s a good idea to bring sun protection, comfortable clothing, snacks, and plenty of water. Most piers have bait and tackle shops where you can rent gear or buy bait.

Q: Can I bring my kids to the fishing piers? A: Absolutely! Many of the piers in the Outer Banks are family-friendly and offer amenities like arcades and restaurants.

Q: What types of fish can I catch in the Outer Banks? A: The Outer Banks is home to a variety of fish species, including Flounder, Red Drum, Bluefish, Spanish Mackerel, King Mackerel, and Cobia, among others.

Remember, the Outer Banks is more than a fishing destination; it’s a community of anglers ready to share their love for the sea. So, cast your line, reel in the adventure, and become a part of our fishing family. We can’t wait to hear your fishing tales!

Posted on 1 Comment

Best Beaches of the Outer Banks: A Symphony of Sand and Surf

Best Beaches in the Outer Banks

Imagine a place where the sun paints the sky with hues of gold and crimson as it kisses the horizon, where the ocean whispers tales of the deep, and the sand beneath your feet is a canvas of countless stories. Welcome to the Outer Banks (OBX) – a 200-mile-long string of barrier islands off the coast of North Carolina, where every grain of sand has a tale to tell, and every wave brings a new adventure.

OBX is not just a destination; it’s a feeling, a state of mind. It’s the gentle lullaby of the ocean waves that puts the world to rest, the salty breeze that carries secrets of the deep, and the warm sand that invites you to leave your worries behind and embrace the joy of the present moment.

But here’s the thing about the Outer Banks – it’s not a one-size-fits-all kind of place. Each beach here has its own personality, its own rhythm. Some are lively, buzzing with energy and laughter. Others are serene, offering a tranquil haven for those seeking solitude and peace. Some are perfect for adventurous water sports, while others are best suited for leisurely strolls and quiet reflection.

Choosing the right beach in OBX is like choosing the right melody for your song – it sets the tone for your entire experience. That’s why we’re here, to guide you through the symphony of sand and surf that is the Outer Banks, helping you find the perfect beach that resonates with your rhythm, your preferences, and your idea of a perfect beach getaway.

So, let’s embark on this journey together, exploring the allure of the Outer Banks, one beach at a time.

Understanding the OBX Beaches: A Geographical and Diverse Perspective

The Outer Banks, often referred to as OBX, is a geographical marvel. This chain of barrier islands stretches over 200 miles along the North Carolina coast, forming a thin line between the Atlantic Ocean and the mainland. The OBX is a unique blend of serene villages, bustling towns, and untouched natural landscapes, all connected by the scenic NC Highway 12, also known as the “Beach Road”.

The OBX is divided into the Northern Beaches, Roanoke Island, Hatteras Island, and Ocracoke Island. The Northern Beaches include towns like Corolla, known for its wild horses, and Duck, famous for its quaint shopping and dining scene. Roanoke Island is steeped in history, housing the town of Manteo and the site of the first English colony in the New World. Hatteras Island is home to several charming villages and the iconic Cape Hatteras Lighthouse. Finally, Ocracoke Island, accessible only by ferry, is a world of its own with a unique island charm.

But the real stars of the OBX are its beaches. The Outer Banks beaches are as diverse as they are beautiful. From the bustling, activity-filled beaches of Nags Head and Kitty Hawk to the tranquil, untouched shores of Portsmouth Island, there’s a beach for every kind of vacationer in the OBX.

Some beaches, like those in Duck and Corolla, are primarily accessible to those staying in the adjacent communities, offering a more private beach experience. Others, like those in Kill Devil Hills and Nags Head, are dotted with public access points, lifeguard stands, and nearby amenities, making them popular choices for families and day visitors.

For the adventurous, the 4×4 beaches of Carova offer an off-the-beaten-path OBX experience. Accessible only by four-wheel-drive vehicles, these beaches are where you can spot the famous wild horses of the OBX, making for an unforgettable Outer Banks vacation.

In the Outer Banks, North Carolina beaches are more than just stretches of sand—they’re gateways to unique experiences. Each beach has its own charm, its own allure, and its own way of etching unforgettable memories in the hearts of those who visit.

Detailed Reviews of Top OBX Beaches

Nags Head: A Blend of History and Beach Bliss

Nags Head is one of the oldest and most well-known towns in the Outer Banks. It’s known for its beautiful beaches, rich history, and variety of attractions and activities.

The beaches in Nags Head are wide and sandy, with plenty of space for beachgoers to spread out and enjoy the sun and surf. The waters are generally calm, making it a great spot for swimming, sunbathing, and beachcombing. Lifeguards are on duty during the summer season, providing an extra layer of safety for families.

One of the unique features of Nags Head is its sand dunes. The town is home to Jockey’s Ridge State Park, which boasts the tallest natural sand dune system in the Eastern United States. Visitors can climb the dunes for a stunning view of the surrounding area, go hang gliding, or enjoy a picnic.

Beyond the beach, Nags Head offers a range of attractions and activities. The town is home to Jennette’s Pier, a popular spot for fishing and sightseeing. The pier also has a research center that offers educational programs and exhibits.

Nags Head also offers excellent opportunities for shopping and dining. The town has a variety of shops, ranging from beach gear and clothing to antiques and art. There are also numerous restaurants, offering everything from fresh seafood to international cuisine.

Kitty Hawk: The Quintessential Summer Beach

Kitty Hawk is located in the northern part of the Outer Banks and is known for its wide, sandy beaches. The town itself is a blend of residential areas and local businesses, giving it a friendly, community feel.

The beaches in Kitty Hawk are a major draw. They are well-maintained and offer plenty of space for beachgoers to spread out and enjoy the sun and surf. The waves here are typically gentle, making it a great spot for swimming, boogie boarding, and beginner surfers. Lifeguards are on duty during the summer season, adding an extra layer of safety for families and swimmers.

One of the unique features of Kitty Hawk is its beach access. There are numerous public beach accesses throughout the town, many of which offer free parking. Some accesses also have additional amenities like picnic areas, restrooms, and showers.

Beyond the beach, Kitty Hawk offers a range of outdoor activities. The Kitty Hawk Woods Coastal Reserve is a 1,800-acre maritime forest that offers hiking, birdwatching, and kayaking. There’s also a popular bike path that runs through the town, perfect for a leisurely ride or a morning jog.

For history buffs, Kitty Hawk is notable as the place where the Wright Brothers first achieved powered flight in 1903. The Wright Brothers National Memorial in nearby Kill Devil Hills commemorates this historic event.

With its beautiful beaches, outdoor activities, and friendly atmosphere, Kitty Hawk offers a classic Outer Banks vacation experience.

Avon Beach: A Low-Key Family Paradise

Avon Beach, located on Hatteras Island, is known for its laid-back atmosphere and beautiful, wide sandy beaches. It’s a favorite among families and those seeking a peaceful beach experience.

One of the main advantages of Avon Beach is its proximity to a range of rental homes. Many of these homes are located right on the beach, offering stunning views and easy access to the sand and surf. This makes it incredibly convenient for families or groups who want to enjoy a beachfront stay.

The beach itself is typically less crowded than some of the more northern Outer Banks beaches, providing plenty of space for beach games, sunbathing, and building sandcastles. The waters are generally calm, making it a good spot for swimming and boogie boarding.

Fishing is also popular in Avon, with the Avon Fishing Pier providing a great spot to cast a line. The pier also has a bait and tackle shop and offers fishing lessons for beginners.

Nearby, you’ll find a variety of local shops and restaurants, as well as a grocery store, making it easy to stock up on vacation essentials or grab a bite to eat.

With its relaxed vibe, beautiful beaches, and convenient amenities, Avon Beach offers a delightful Outer Banks beach experience.

Ocracoke Island: A Secluded Beach Haven

Ocracoke Island is located at the southernmost end of the Outer Banks and is accessible only by ferry, private boat, or plane, which adds to its secluded charm. The island is known for its 16 miles of pristine, undeveloped beaches, which are consistently ranked among the best in the nation.

The beaches on Ocracoke Island are wide and sandy, with rolling dunes and the occasional cluster of seashells. The surf is typically gentle, making it a great spot for swimming and sunbathing. The beaches are also less crowded than those in other parts of the Outer Banks, offering a peaceful and relaxing beach experience.

One of the unique features of Ocracoke’s beaches is the opportunity for shelling. The island’s location and the ocean currents often bring a variety of shells to its shores, making it a favorite spot for shell collectors.

Beyond the beach, Ocracoke Village offers a range of attractions. The Ocracoke Lighthouse, one of the oldest operating lighthouses in the United States, is a must-see. The village also has a variety of shops, restaurants, and galleries, offering a glimpse into the island’s vibrant local culture.

Ocracoke Island is also known for its history. It was a favorite haunt of the infamous pirate Blackbeard, and the island hosts an annual Pirate Jamboree in his honor.

With its beautiful, secluded beaches, rich history, and charming village, Ocracoke Island offers a unique and memorable Outer Banks experience.

Rodanthe: A Quiet, Family-Friendly Retreat

Rodanthe, located on Hatteras Island, is known for its serene, natural beauty and its wide, sandy beaches. It’s the northernmost village on the island and offers a peaceful retreat for those seeking a quiet beach vacation.

The beaches in Rodanthe are typically less crowded than those in other parts of the Outer Banks, providing plenty of space for beachgoers to relax and enjoy the sun and surf. The waters are generally calm, making it a great spot for swimming, sunbathing, and beachcombing.

Rodanthe is perhaps best known for its starring role in the movie “Nights in Rodanthe,” based on the novel by Nicholas Sparks. The house used in the film, known as the Serendipity House, is a popular attraction and can be seen perched on the beach.

Beyond the beach, Rodanthe offers a range of outdoor activities. The area is a popular spot for fishing, with both surf fishing and charter fishing opportunities available. The Pamlico Sound, located on the west side of the island, is a favorite spot for windsurfing and kiteboarding.

For nature lovers, the Pea Island National Wildlife Refuge is located just north of Rodanthe and offers excellent birdwatching opportunities. The refuge is home to a variety of bird species and also serves as a nesting site for sea turtles.

With its quiet beaches, outdoor activities, and Hollywood connection, Rodanthe offers a unique and tranquil Outer Banks experience.

Waves: A Beach with a Split Personality

Waves is located on Hatteras Island, nestled between the towns of Rodanthe and Salvo. It’s a small, quiet community that’s known for its beautiful beaches and excellent water sports opportunities.

The beach in Waves is wide and sandy, with plenty of space for beachgoers to spread out and enjoy the sun and surf. The waters are generally calm, making it a great spot for swimming and sunbathing. The beach is also less crowded than those in other parts of the Outer Banks, offering a peaceful and relaxing beach experience.

What sets Waves apart is its access to both the Atlantic Ocean and the Pamlico Sound. This unique location makes it a hotspot for water sports. The ocean side is popular for surfing and boogie boarding, while the sound side is renowned for its windsurfing and kiteboarding. In fact, Waves is considered one of the best kiteboarding spots on the East Coast.

There are several local businesses that offer water sports lessons and equipment rentals, making it easy for visitors of all skill levels to try out these activities. Whether you’re a seasoned pro or a complete beginner, you can enjoy the thrill of riding the waves or the wind in this Outer Banks town.

Beyond the beach, Waves offers a range of amenities including local restaurants, shops, and vacation rentals. It’s a great base for exploring the rest of Hatteras Island and the Outer Banks.

With its beautiful beaches, water sports opportunities, and laid-back vibe, Waves offers a unique and enjoyable Outer Banks experience.

Carova Beach: A Wild and Unique Experience

Carova Beach, often referred to as part of Corolla, is located in the northernmost part of the Outer Banks. It’s unique in that it’s only accessible by 4×4 vehicles or by boat, which adds to its secluded and untouched charm.

One of the main attractions of Carova Beach is its wild horses. These horses are believed to be descendants of Spanish mustangs that were shipwrecked in the 16th century. Today, they roam freely in the area, often seen grazing in the grass or walking along the beach. It’s a truly unique sight that adds a touch of magic to the Carova Beach experience.

The beach itself is wide and sandy, with rolling dunes and the occasional cluster of seashells. The surf is typically gentle, making it a great spot for swimming and sunbathing. The beaches are also less crowded than those in other parts of the Outer Banks, offering a peaceful and relaxing beach experience.

Fishing is popular in Carova, with the surf providing a great spot to cast a line. The area is also popular for off-road beach driving, with miles of beach to explore. However, visitors are reminded to respect the local wildlife and adhere to the rules regarding speed limits and designated driving areas.

Nearby, in the town of Corolla, you’ll find a range of amenities including shops, restaurants, and attractions like the historic Corolla Lighthouse and the Whalehead Club.

With its wild horses, beautiful, secluded beaches, and 4×4 adventure, Carova Beach offers a unique and memorable Outer Banks experience.

Cape Point Beach: A Historic Fishing Spot

Cape Point Beach is located in Buxton, near the iconic Cape Hatteras Lighthouse. It’s often referred to as the point where the two major Atlantic currents, the Labrador Current and the Gulf Stream, meet. This unique geographical position makes Cape Point one of the best fishing spots in the Outer Banks.

The beach itself is wide and sandy, with plenty of room for beachgoers to spread out and enjoy the sun and surf. The water at Cape Point is typically warmer than at other Outer Banks beaches, thanks to the influence of the Gulf Stream.

One of the main attractions near Cape Point Beach is the Cape Hatteras Lighthouse. This historic lighthouse is the tallest brick lighthouse in North America and a beloved symbol of the Outer Banks. Visitors can climb the lighthouse for a stunning view of the surrounding seascape.

Cape Point Beach is also a popular spot for off-road vehicle (ORV) use. There are designated ORV routes that allow visitors to drive on the beach, making it easier to transport fishing gear or beach supplies. However, certain areas may be closed during sea turtle and bird nesting seasons to protect these species.

It’s worth noting that the currents at Cape Point can be strong, and rip currents are common. Swimmers should be cautious and heed any warnings or advisories.

With its excellent fishing, warm waters, and proximity to the Cape Hatteras Lighthouse, Cape Point Beach offers a unique and enjoyable Outer Banks beach experience.

Portsmouth Island: An Isolated Adventure

Portsmouth Island is one of the barrier islands in the Outer Banks, located south of Ocracoke Island. It’s unique in that it’s entirely uninhabited by humans, offering a truly remote and natural beach experience. The island is only accessible by private boat or ferry, adding to its secluded charm.

One of the main attractions on Portsmouth Island is the ghost town of Portsmouth Village. Established in the late 18th century, Portsmouth was once a bustling port village. However, over time, the population dwindled, and today, the village stands as a well-preserved ghost town. Visitors can explore the historic buildings, including homes, a post office, and a church, all maintained by the National Park Service.

The beaches on Portsmouth Island are wide and uncrowded, perfect for those seeking solitude and unspoiled natural beauty. The island is also a popular spot for camping, with visitors allowed to camp anywhere on the beach.

For wildlife enthusiasts, Portsmouth Island is a haven. The island is part of the Cape Lookout National Seashore, which is home to a variety of bird species, making it a great spot for birdwatching. You might also spot sea turtles, as the island is a nesting site for several species.

Fishing is another popular activity on Portsmouth Island. The surf, sound, and inshore waters offer opportunities to catch a variety of fish, including red drum, flounder, and speckled trout.

Visiting Portsmouth Island is like stepping back in time. Its isolation, natural beauty, and historical significance make it a unique part of the Outer Banks experience.

Duck’s Private Beaches: An Exclusive Outer Banks Experience

Duck, located in the northern Outer Banks, is known for its beautiful beaches, upscale amenities, and vibrant local culture. It’s a favorite among families and those seeking a peaceful yet sophisticated beach vacation.

The beaches in Duck are wide and sandy, with gentle surf that’s perfect for swimming and sunbathing. One unique feature of Duck’s beaches is that they are private for residents and guests only, which helps maintain a quiet and uncrowded atmosphere. Lifeguards are on duty during the summer season, providing an extra layer of safety for families.

Beyond the beach, Duck offers a range of attractions and activities. The town boasts a vibrant arts scene, with several galleries and arts events throughout the year. The Duck Town Park and Boardwalk is a popular spot, offering beautiful views of the Currituck Sound, a playground, and a path that winds through maritime forest and willow swamps.

Duck is also known for its dining scene. The town offers a variety of restaurants, ranging from casual eateries to upscale dining options, many of which offer stunning waterfront views. Seafood is a specialty in Duck, with many restaurants serving fresh, locally caught fare.

For shoppers, Duck offers a range of options. The town’s shopping scene is characterized by its locally owned boutiques and specialty shops, where you can find everything from beach gear and clothing to gourmet food and wine.

With its beautiful private beaches, upscale amenities, and vibrant local culture, Duck offers a unique and sophisticated Outer Banks experience.

Planning Your Visit to the OBX

Best Time to Visit

The Outer Banks is a year-round destination, but the best time to visit depends on what you’re looking for. If you’re after warm weather and don’t mind the crowds, summer (June to August) is the peak season. The beaches are vibrant, and the water is warm, perfect for swimming and sunbathing.

For those who prefer a quieter, more relaxed atmosphere, spring (April to June) and fall (September to November) are excellent choices. The weather is mild, and the beaches are less crowded. Plus, you might get to witness the spectacular migration of birds in the spring or enjoy the stunning fall foliage.

Winter in the Outer Banks is a season of tranquility. While it’s too cold for swimming, it’s a great time for beach walks, fishing, and enjoying the serene beauty of the OBX without the crowds.

Accommodation Options

The Outer Banks offers a wide range of accommodation options to suit every budget and preference. From luxurious oceanfront homes and quaint bed and breakfasts to budget-friendly motels and campgrounds, you’ll find it all here.

For those planning a family vacation or traveling in a large group, rental homes are a popular choice. They come in all sizes and offer the comfort and convenience of a home away from home. Many of these homes are located right on the beach, offering stunning views and easy access to the sand and surf.

If you prefer the convenience of a hotel, there are plenty of options available, including well-known chains and unique, locally-owned establishments.

For the more adventurous, camping is a great way to connect with nature. The Outer Banks has several campgrounds, including those with beach access, offering a unique way to experience the OBX.

Tips for Booking in Advance

The Outer Banks is a popular destination, and accommodations can fill up quickly, especially during the peak summer season. It’s a good idea to book your stay well in advance to secure your preferred dates and accommodation type.

When booking, consider the location and proximity to the beaches and other attractions you want to visit. If you’re planning to visit during the off-peak season, check whether the amenities and attractions you’re interested in will be open.

Remember, the Outer Banks is a long string of islands, so getting from one end to the other can take some time. Plan your stay accordingly to make the most of your Outer Banks vacation.

Activities Beyond the Beach

The Outer Banks isn’t just about the beaches. While the sandy shores and sparkling waters are undoubtedly the main draw, there’s a wealth of other attractions and activities to explore. From historical sites and local cuisine to water sports and wildlife, the OBX has something for everyone.

Historical Sites

The Outer Banks is steeped in history. Visit the Wright Brothers National Memorial in Kill Devil Hills, where Orville and Wilbur Wright made their historic first flight. Explore the Fort Raleigh National Historic Site, the location of the first English settlement in the New World. Don’t miss the iconic Cape Hatteras Lighthouse, the tallest brick lighthouse in North America, offering panoramic views of the surrounding seascape.

Local Cuisine

Foodies will love the Outer Banks for its fresh seafood and local cuisine. Try the catch of the day at one of the many seafood restaurants, or sample the local specialty, Carolina-style barbecue. Don’t forget to try an Outer Banks original – the apple ugly, a deliciously sweet and sticky pastry.

Water Sports

If you’re a fan of water sports, the Outer Banks is your playground. The area is renowned for its surfing, with consistent waves suitable for all skill levels. The soundside waters are perfect for paddleboarding, kayaking, and kiteboarding. For a unique OBX experience, try your hand at crabbing or clamming.

Wildlife Encounters

The Outer Banks is a haven for wildlife. Take a 4×4 tour to see the wild horses of Corolla, direct descendants of Spanish mustangs that swam ashore from shipwrecks centuries ago. Visit the Pea Island National Wildlife Refuge, a vital stopover for migratory birds. Or take a dolphin-watching tour and see these playful creatures in their natural habitat.

Shopping and Art

The Outer Banks boasts a vibrant arts scene and unique shopping experiences. Browse the local art galleries and craft shops, where you can find everything from handcrafted jewelry to local artwork. Visit the quaint shops in Duck and Corolla, where you’ll find unique gifts, beachwear, and OBX souvenirs.

Fishing and Boating

With the Atlantic Ocean on one side and the Pamlico Sound on the other, the Outer Banks is a fisherman’s paradise. Charter a boat for a day of deep-sea fishing, or cast a line from one of the many fishing piers. For a relaxing day on the water, rent a pontoon boat and explore the sound at your own pace.

The Outer Banks is more than just a beach destination. It’s a place where history, nature, and adventure come together to create a vacation experience like no other. So come, explore, and discover the magic of the OBX beyond the beach.

Wrapping Up Your OBX Adventure

The Outer Banks of North Carolina is a treasure trove of sun, sand, and surf. Each beach, from Nags Head’s historic charm to the wild beauty of Carova Beach, offers a unique slice of beach bliss. Whether you’re a thrill-seeker, a nature lover, or someone seeking relaxation, there’s a beach here that’s just right for you.

But the allure of the OBX extends beyond its stunning beaches. The rich history, delectable local cuisine, abundant water sports, and diverse wildlife add layers of intrigue and excitement to your beach vacation. The vibrant arts scene and unique shopping experiences offer delightful diversions from the beach.

Planning your visit to the OBX is key to making the most of your vacation. Choose the right time to visit, find your perfect accommodation, and book in advance to ensure a smooth and enjoyable trip.

The Outer Banks beckons with its promise of unforgettable beach days and beyond-the-beach adventures. So pack your bags, set your out-of-office reply, and get ready to immerse yourself in the OBX experience. Your perfect beach awaits!

Join the OBX Adventure

Now that you’ve got a taste of what the Outer Banks has to offer, it’s time to start planning your own OBX adventure. Whether you’re a first-time visitor or a seasoned OBX vacationer, there’s always something new to discover in this beautiful beach destination.

We’d love to hear about your favorite OBX experiences, your top beach picks, and any tips you might have for fellow travelers. Share your stories with us and be sure to reach out to us on social media. And if you have any questions about planning your OBX vacation, don’t hesitate to ask. We’re here to help you make your Outer Banks vacation as memorable as possible.

Frequently Asked Questions

What is the best time to visit the Outer Banks?

The Outer Banks is a year-round destination, but the best time to visit depends on your preferences. Summer is the peak season with warm weather and bustling beaches. Spring and fall offer milder weather and fewer crowds, while winter is a time of tranquility and serene beauty.

What are the best beaches in the Outer Banks?

The Outer Banks boasts a variety of beaches, each with its own unique charm. Some of the top beaches include Nags Head, Kitty Hawk, Avon Beach, Ocracoke Island, and Carova Beach. The best beach for you depends on your preferences for activities, atmosphere, and amenities.

What activities are there in the Outer Banks besides beachgoing?

The Outer Banks offers a wealth of activities beyond the beach, including visiting historical sites, sampling local cuisine, engaging in water sports, encountering wildlife, shopping, and exploring the arts scene.

What types of accommodations are available in the Outer Banks?

The Outer Banks offers a wide range of accommodations, including rental homes, hotels, bed and breakfasts, and campgrounds. The best option depends on your budget, group size, and preferences.

How can I see the wild horses of the Outer Banks?

The wild horses of the Outer Banks can be seen in the northern beaches, particularly in Corolla and Carova Beach. The best way to see them is on a guided 4×4 tour, which ensures you can view the horses safely and responsibly.

Posted on

The Ultimate Guide to Early Season Deer Hunting: Strategies, Tactics, and Tips

Early Season Velvet Buck

As the summer heat begins to fade and the first signs of fall start to make their appearance, a unique opportunity arises for deer hunters. The early season, a period that is often overlooked, presents both a challenge and an opportunity for those willing to understand and adapt to the unique behaviors of deer during this transition. 

Early season deer hunting can indeed be a tough game. Mature whitetail bucks aren’t driven by the breeding instincts of the rut, nor are they forced to food sources by harsh winter conditions. Instead, they are in a state of flux, changing their main food sources and sometimes even their core areas as summer gives way to fall. 

However, it’s not all uphill. The early season also offers a distinct advantage: the deer haven’t been subjected to hunting pressure yet. This means that dedicated whitetail hunters who have spent their summer and early fall scouting meticulously stand a real chance at bagging a mature buck before the full intensity of the hunting season kicks in and turns the deer nocturnal. 

In this article, we will take a look into the best strategies, tactics, and tips for early season deer hunting. We’ll explore how to pattern bucks before the season starts, understand their dietary shifts, set up stands effectively, and adapt different strategies for private and public lands. Whether you’re a seasoned hunter or a beginner, this guide will equip you with the knowledge you need to make the most of the early deer hunting season. So, let’s embark on this journey and uncover the secrets of successful early season deer hunting.

Pre-Season Preparation: Patterning Bucks, Trail Cameras, and Food Plots

Preparation is the key to success in any endeavor, and early season deer hunting is no exception. The pre-season period is a crucial time to gather information, strategize, and set up for the hunting season. Let’s dive into the key aspects of pre-season preparation: patterning bucks, using trail cameras, and creating food plots.

Patterning Bucks

Patterning bucks before the season starts is an essential part of your hunting strategy. This involves understanding the behavior and movement patterns of mature bucks in your hunting area. Remember, mature bucks are experts at avoiding hunters, which is how they’ve managed to grow old. To outsmart them, you need to put in the work before the hunting season starts.

Start by identifying potential feeding and bedding areas. Look for signs of deer activity such as tracks, droppings, rubs, and scrapes. Pay attention to the times of day when you observe the most activity, as this can give you clues about the deer’s daily routines.

Using Trail Cameras Effectively

Trail cameras are a vital tool for patterning bucks. They provide a way to monitor deer activity without disturbing the area with your presence. However, simply setting up a trail camera isn’t enough; you need to use it effectively.

First, consider the placement of your trail cameras. They should be set up around major food sources and trails leading to these food sources. It’s also beneficial to place cameras near potential bedding areas to capture movement during the early morning and late evening.

Second, make sure your cameras are set to capture images at regular intervals, as well as when triggered by motion. This will provide a comprehensive picture of deer activity throughout the day. My camera of choice is the Tactacams and I like to place them 8-10ft up in a tree to keep them out of sight of anyone with sticky fingers.

Using a cell cam allows you to limit leaving scent in the area as the season gets closer. Pictures and even videos get sent straight to your phone eliminating the need to pull sd cards to check them.

Interpreting Trail Camera Pictures

Trail camera pictures can provide a wealth of information, but only if you know how to interpret them. They can tell you if nice bucks are around, but more importantly, they can help you figure out where those bucks are heading, where they’re coming from, and where they might be vulnerable.

Look for patterns in the pictures. Are there certain times when the bucks are more active? Are they frequently seen with other deer? Are there specific areas they seem to prefer? All these details can help you build a picture of the buck’s habits and preferences. Possibly even set up an excel spreadsheet to analyze the data and possibly identify any common patterns you may have missed otherwise.

Creating Food Plots

In addition to natural food sources, consider creating food plots to attract and nourish deer. Food plots are areas where you plant specific crops that are known to be attractive to deer. They not only provide a reliable food source for deer but also create an excellent opportunity for you to observe and pattern their behavior.

Choose plants that are known to be favored by deer and suitable for the soil and climate in your area. Some popular choices include clover, brassicas, and certain grains. Remember, the goal is to supplement the deer’s natural diet, not replace it.

Pre-season preparation is all about gathering information and using it to understand the behavior of the deer in your hunting area. By patterning bucks, using trail cameras effectively, interpreting the pictures they capture, and creating food plots, you can set yourself up for a successful early season deer hunt.

Understanding Deer Diet in the Early Season: From High-Protein Plants to High-Calorie Carbohydrates

Understanding the dietary habits of deer is crucial for successful hunting, especially during the early season when food sources and eating patterns undergo significant changes. Let’s look into the dietary transition of deer, the role of acorns, crops, soft mast, and the importance of water sources.

The Dietary Transition of Deer

As the seasons change from summer to fall, so does the diet of deer. During the summer months, deer primarily feed on high-protein plants, such as legumes, forbs, and leaves of woody plants. This protein-rich diet helps them grow and maintain their body mass and, for bucks, develop antlers.

However, as fall approaches, their dietary needs shift. They begin to transition from high-protein plants to high-calorie carbohydrates. This shift is driven by the need to build up fat reserves to survive the upcoming winter. Carbohydrates provide more energy than protein, making them ideal for this purpose.

The Significance of Acorns in the Deer Diet

Acorns play a significant role in the deer diet during the early season. They are a rich source of carbohydrates and fats, making them an excellent food for building up energy reserves. In fact, where they occur, acorns are often the most preferred natural food of whitetail deer.

There are two general groups of oak trees that produce acorns: white and red oaks. White oak acorns tend to drop earlier and contain fewer tannins, making them sweeter and more attractive to deer. Once the white oak acorns are depleted, deer will switch to red oak acorns. Be sure you can identify both types of oak trees and plan to hunt them accordingly. White oaks in the early season could be the ticket to harvesting an early season buck.

The Role of Crops and Soft Mast in the Deer Diet

In addition to acorns, crops and soft mast also play a crucial role in the deer diet during the early season. Crops such as corn and soybeans represent an almost limitless source of carbohydrates. Deer may overlook hard, dry soybeans in the early season, until a prolonged rain softens them up.

Soft mast, like apples, persimmons, and berries, may be far more important as an early-season food source than many hunters realize. These fruits are high in sugar and are very attractive to deer. When these fruits ripen and fall to the ground, deer will often prefer them over other food sources.

The Importance of Focusing on Water Sources

Water is a vital part of the deer diet, especially during the early season when temperatures can still be quite high. Deer need to drink water daily, and they will often visit water sources before they go out to feed. Focusing your scouting on water can be especially effective during drought years. A camera over a known water source can produce excellent results.

Understanding the dietary habits of deer during the early season can significantly improve your hunting success. By focusing on the right food and water sources, you can predict deer movements more accurately and increase your chances of a successful hunt.

Best Stand Setups for Early Season Deer: Adapting to Changing Conditions and Choosing the Right Sites

Choosing the right stand setup is a critical part of early season deer hunting. The early season is characterized by rapidly changing conditions, and your stand setup needs to adapt accordingly. Let’s explore the importance of adapting to changing conditions and the six best stand sites for early season deer hunting. This is a prime example why I saddle hunt. Being able to stay mobile and adapt to changing conditions will keep you one step ahead.

Adapting to Changing Conditions

In the early season, conditions can change quickly. Food sources shift as crops mature and are harvested, acorns start to drop and are depleted, and deer behavior changes as they adjust to these shifts. As a hunter, you need to be observant and reactive. 

For instance, if you notice that a certain food source is no longer attracting deer, it’s time to move your stand to a different location. Similarly, if you observe that deer are changing their travel routes, you need to adjust your stand setup accordingly. 

Six Best Stand Sites for Early Season Deer Hunting

1. Agricultural Fields: Deer are attracted to agricultural fields, especially in the early season when these fields are full of crops. However, it’s important to avoid spooking the deer when entering and exiting your stand. Consider setting up your stand at the edge of the field, where you can observe the deer without disturbing them. If you haven’t read my article on thermals be sure to give it a read. Deer will often come from the low side of a field where thermals tend to fall.

2. Food Plots: If you’ve created food plots, these can be excellent stand sites. Deer are likely to visit these plots regularly, providing you with plenty of opportunities for a shot. Try to position your stand near cover, so you can approach and leave without being detected.

3. Bedding-Area Funnels: These are areas where the landscape naturally funnels deer movement, often between bedding areas and food sources. Setting up a stand in these areas can be highly effective, but it’s a high-risk, high-reward strategy. You need to be very careful not to disturb the deer and ruin the spot.

4. Stands of Oaks:As we’ve discussed, acorns are a major food source for deer in the early season. Setting up a stand in an area with plenty of oak trees can be very productive. However, you need to be ready to move your stand as the availability of acorns changes.

5. Soft Mast: Areas with soft mast trees (like apple, pear, or persimmon trees) can also be excellent stand sites. Deer love these fruits and will often visit these areas regularly. However, keep in mind that soft mast generally doesn’t last long once it hits the forest floor. When the fruit is gone, it’s time to move your stand.

6. Scrape Lines: These are areas where bucks have scraped the ground and nearby trees with their antlers, often along their travel routes. Setting up a stand near a scrape line can be a good strategy, especially if the scrape line is fresh. However, keep in mind that deer generally visit early-season scrapes after dark.

The best stand setup for early season deer hunting depends on a variety of factors, including the available food sources, the deer’s travel routes, and the changing conditions. By being observant, adaptable, and strategic in your stand placement, you can increase your chances of a successful hunt.

Strategies for Hunting on Private Land: Keeping Bucks Calm and Avoiding Unnecessary Pressure

Hunting on private land offers a unique set of opportunities and challenges. The strategies you employ on private land can significantly differ from those used on public land, particularly in terms of managing pressure on the deer. Let’s look into the importance of keeping targeted bucks calm and relaxed and share some tips from experienced hunters on how to avoid unnecessary pressure.

Keeping Targeted Bucks Calm and Relaxed

One of the key strategies when hunting on private land is to keep targeted bucks as calm and relaxed as possible. Unlike public lands, where deer are often accustomed to human activity, deer on private lands can be more sensitive to disturbances. Any unusual activity, such as the scent or noise of a hunter, can put them on high alert and make them more elusive and turn nocturnal.

To keep bucks calm, it’s crucial to minimize your presence in their habitat. This means limiting the amount of time you spend in the hunting area before and during the hunting season. When you do need to enter the area, for instance, to set up stands or check trail cameras, try to do so quietly and quickly to minimize disturbance. Take your scent free routine seriously. I always leave all my camo in a bin covered with pine needles in my car. I never wear my hunting clothes until I get out of my truck and it’s time to hunt.

Avoiding Unnecessary Pressure

Experienced hunters understand that applying too much pressure can drastically reduce their chances of success. Here are some tips to avoid unnecessary pressure:

1. Smart Scouting: Use cellular trail cameras to monitor deer activity without physically being in the area. When you do need to scout in person, try to leave as little trace as possible. Avoid walking through bedding areas or prime feeding spots where you might leave your scent.

2. Careful Stand Placement: Place your stands in locations that allow you to enter and exit without disturbing the deer. This often means setting up along the edges of the deer’s core area, rather than in the middle of it.

3. Playing the Wind: Always consider the wind direction when hunting. You want to approach your stand from downwind to prevent your scent from reaching the deer. 

4. Limiting Hunting Pressure: Resist the urge to hunt every day. Overhunting an area can make deer wary and change their patterns. Instead, hunt strategically, focusing on the best weather conditions and times of day.

5. Silence is Golden: Be as quiet as possible when you’re in the hunting area. Noise can alert deer to your presence and make them more cautious. Use quiet gear, move slowly and deliberately, and avoid unnecessary talking or noise.

Hunting on private land requires a careful, strategic approach that prioritizes keeping deer calm and relaxed. By minimizing your presence, avoiding unnecessary pressure, and using smart hunting strategies, you have increased odds of killing that deer you’re after.

Strategies for Hunting on Public Land: A Different Approach for Rewarding Results

Hunting on public land is a different game altogether compared to private land hunting. It presents its own set of challenges, but also unique rewards. The thrill of harvesting a mature buck on public land, where the pressure is high and the odds are often stacked against you, is unmatched. Let’s discuss the different approach needed for hunting on public land and share some tips on how to hunt aggressively and effectively.

A Different Approach for Public Land Hunting

Public land hunting requires a different mindset and strategy. Unlike private lands, public lands are accessible to everyone, which means the deer there are usually more pressured and wary. They’re accustomed to human activity and have adapted to avoid it. This requires hunters to be more aggressive and proactive in their strategies.

On public land, deer are less likely to follow predictable patterns, especially mature bucks. They often take advantage of thick cover and rugged terrain to avoid hunters. Therefore, successful public land hunting often involves going deeper and hunting harder than others are willing to.

Hunting Aggressively and Effectively on Public Land

Here are some tips from experienced hunters on how to hunt aggressively and effectively on public land:

1. Scout Thoroughly: Spend as much time as you can scouting. Look for signs of deer activity, such as tracks, droppings, rubs, and scrapes. Use topographic maps and aerial imagery to identify potential bedding areas, feeding areas, and travel corridors. 

2. Go Deep: Don’t be afraid to venture into the more remote, hard-to-reach areas of public land. These areas often receive less hunting pressure and can be a refuge for mature bucks. 

3. Hunt the Thick Stuff: Mature bucks on public land often take refuge in thick cover. Don’t shy away from these areas. Instead, learn how to hunt them effectively. This might involve still-hunting or setting up a stand or ground blind near the edge of the thick cover.

4. Be Mobile: Being able to move quickly and adapt to changing conditions is crucial on public land. Using a tree saddle and staying mobile is the best advice I can give you. If a location isn’t producing results, don’t hesitate to move.

5. Play the Wind: As with any type of deer hunting, always consider the wind direction. Try to approach your hunting area and set up your stand or blind with the wind in your favor.

6. Hunt During Off-Peak Times: Hunting during the week or during inclement weather can increase your chances of success, as there will likely be fewer hunters on public land during these times. With my schedule hunting Mon-Fri isn’t an issue and that’s when I find less hunters to be in the woods.

Top Tips for Early Season Deer Hunting: Patience, Stalking, and Strategic Positioning

Here are some practical tips for successful early season deer hunting, emphasizing the importance of patience, stalking, and strategic positioning.

1. Patience is Key: Deer hunting, especially in the early season, is a game of patience. Deer are not as active during the early season as they are during the rut, so it may take longer for them to appear. Don’t get discouraged if you don’t see deer right away. Stay patient and keep your eyes peeled for any signs of movement. They are not being highly pressured yet so their guard still may be down.

2. Master the Art of Stalking: Stalking involves slowly and quietly moving through the hunting area in search of deer. This can be an effective strategy in the early season when deer are often feeding in open areas. Practice moving quietly and staying low to avoid detection.

3. Strategic Positioning: Where you position yourself can have a significant impact on your hunting success. Try to set up near food sources, water sources, and travel corridors that deer are likely to use. Use the wind to your advantage by positioning yourself downwind of the deer’s expected location.

4. Scout Ahead of Time: Scouting before the season starts can give you valuable information about deer movement patterns, preferred food sources, and potential stand locations. Use trail cameras, look for signs of deer activity, and observe from a distance to avoid disturbing the area.

5. Be Ready to Adapt: Conditions can change quickly in the early season, and successful hunters are those who can adapt. Be ready to change your strategy based on the weather, deer activity, and hunting pressure.

6. Practice Good Scent Control: Deer have an excellent sense of smell, and if they catch your scent, they’re likely to avoid the area. Use scent control products and play the wind to prevent deer from detecting your presence.

7. Use the Right Equipment: Having the right equipment can make a big difference in your hunting success. This includes a reliable weapon, appropriate clothing for the weather, and comfortable and quiet footwear for stalking.

8. Take Advantage of the Weather: Deer activity can increase dramatically after a cold front or a rainstorm. If the weather changes, consider heading out to your stand, as the deer are likely to be on the move.

Embrace the Challenge and Thrive in the Early Season

As we bring this article to a close, it’s important to reflect on the key points we’ve discussed and how they can shape your early season deer hunting experience. The early season is a unique period that presents both challenges and opportunities. It’s a time of transition for deer, marked by shifts in their behavior, diet, and movement patterns.

We’ve explored the importance of pre-season preparation, including patterning bucks, effectively using trail cameras, interpreting their pictures, and creating food plots. We’ve talked about the dietary transition of deer from high-protein plants to high-calorie carbohydrates, highlighting the significance of acorns, crops, soft mast, and water sources in their diet.

We’ve discussed the best stand setups for early season deer hunting, emphasizing the need to adapt to changing conditions and identifying the six best stand sites. We’ve also shared strategies for hunting on both private and public lands, underscoring the importance of keeping targeted bucks calm and relaxed on private lands and the need for a more aggressive approach on public lands.

Finally, we’ve shared practical tips for successful early season deer hunting, focusing on the importance of patience, stalking, and strategic positioning. Each of these elements plays a crucial role in your hunting success, and mastering them can significantly enhance your early season deer hunting experience.

However, the most important takeaway from this guide is the need for adaptability. The early season is a dynamic period, and the most successful hunters are those who can adapt to the changing conditions and deer behavior.

As you prepare for the early season, we encourage you to apply these strategies and tips. Remember, every hunting experience is a learning opportunity. So, embrace the challenge, learn from each hunt, and continually refine your strategies. The thrill of harvesting a mature buck in the early season is well worth the effort, and with these tips in your arsenal, you’re well on your way to a successful hunt.

Thank you for joining us on this journey through early season deer hunting. We hope this guide has been informative and inspiring. Now, it’s time to put these strategies into action. Happy hunting!

Join the Conversation and Stay Connected

Now that we’ve shared our insights and strategies for early season deer hunting, we’d love to hear from you. Do you have your own tips or experiences you’d like to share? What strategies have worked for you in the early season? Your insights could be invaluable to other hunters in our community. Let’s learn from each other and continue to grow as a community of passionate and dedicated hunters. Join us on Facebook or at Youtube.com/@DickOutdoors

If you found this guide helpful and want to stay updated with the latest hunting tips and guides, we invite you to subscribe to our newsletter. By subscribing, you’ll receive regular updates and insights directly to your inbox, helping you stay informed and prepared for every hunting season.

Remember, hunting is not just about the harvest. It’s about the thrill of the chase, the connection with nature, and the continual learning and growth. So, let’s embark on this journey together. Subscribe today, join the conversation, and let’s make every hunting season a memorable one. Happy hunting!